Administration Guide
A guide for your Senomix administration screens for Windows, Mac and other desktop systems.
For step-by-step instructions, visit your "How Do I..?" page.
The desktop web application for Senomix Timesheets can be used with your Windows or Mac desktop and laptop computers through any modern web browser.
System screens will be automatically sized to fit the available space on your computer monitor, with a scrollbar appearing on your browser if there is not enough space available to display all information.
For example, a timesheet would appear as follows on a laptop computer monitor with 1280x800 pixels resolution:

And would appear as follows for a desktop computer monitor of 1280x1024 pixels resolution:

As shown, if space is available, additional lines of information will be displayed to fit the screen space available to you. Your computer's screen size does not limit the amount of information you can enter in your Senomix timesheet or expense claim records, and additional lines can be scrolled to off-screen if your computer monitor is too small to display all information at once.
Whenever Senomix Timesheets needs for you to wait while it communicates with your server, your screen will display a grey shade with an animated wait spinner displayed in the middle.
Similarly, when your application has completed a save action for your timesheet or expense claim information, it will inform you of the save success with a checkmark information message displayed in the center of your screen:

To dismiss a confirmation checkmark, just click anywhere outside the checkmark box on your computer screen.
To provide an efficient workflow, most of your administration screens will not display a 'saved' checkmark when saving your project, activity, task or other administrative information. After data has been saved on your system, your green toolbar 'Save' button will return to a disabled state to indicate that no changes are waiting to be saved.
Senomix billing codes can be adjusted to fit the level of precision required for time tracking of each employee. Depending upon the responsibilities of an individual working on a project, this can result in time being tracked on a task-by-task basis or simply by project if a particular activity or task cannot be identified for a person's work.
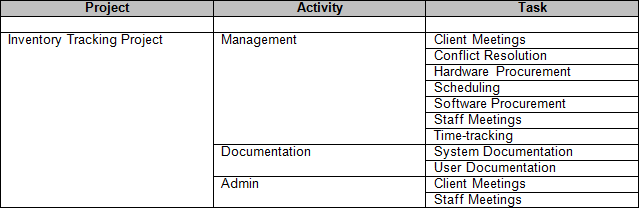
Billing codes can accommodate both unchanging projects (which use the same billing codes year-after-year) and development and system maintenance environments in which project requirements must be quickly addressed as they emerge. Considering an example project for the creation of an inventory tracking system, an initial set of billing codes might be created as follows:
The activities and tasks of Senomix projects can be managed through one or more project template records. A project template is a special type of project whose activities and tasks can be assigned to one or more different projects but is not referenced directly as a project itself.
When a project template's activity and task records are changed, the changes made to that template will apply immediately to all projects assigned to use it. This provides you with a centralized way to manage the activity and task options for dozens, hundreds or thousands of projects at once without requiring numerous edits to each project affected by a billing code change.
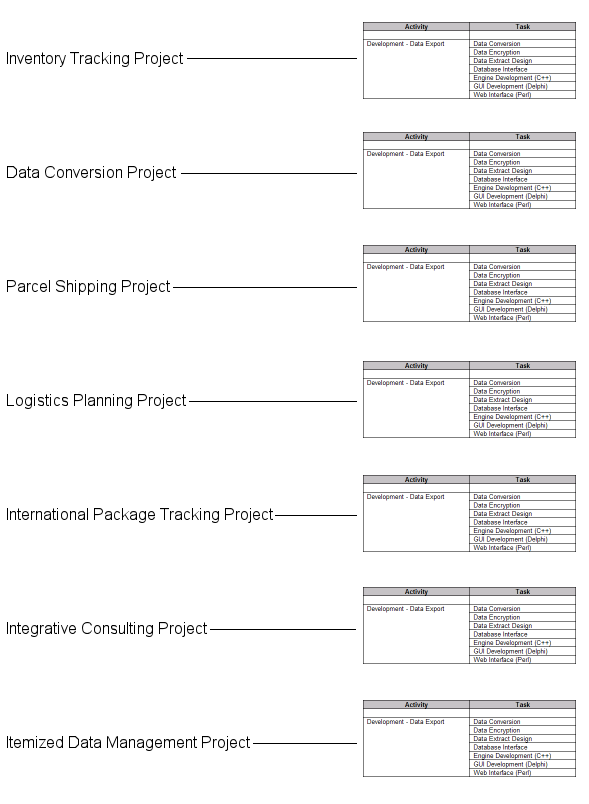
For example, if the inventory tracking project described above had been created as a project template and assigned to a few dozen projects, the changes made to the Development - Data Export task would be applied to all projects at once without any other changes needed.
Showing this in a diagram, project templates allow multiple projects to 'point to' the same, single set of activities and tasks:

Whereas a set of standard projects (often created through a project copy action) will each have their own set of individual activity and task records:
Although the activities and tasks are still named identically after performing a project copy, each set of billing codes are created and edited independently (which can make the management of your Senomix projects more difficult over time). To avoid this, project templates should be used in place of 'project copy' whenever possible.
Project templates should be used for all projects in your office which have a similar structure.
A 'project copy' action should only be performed to help set up a new project template, or to create custom activity and task lists if your office performs a few large-scale projects each year. For simplicity, long-term projects which will only be referenced once in your system (such as internal records for recording in-house administration or vacation time) should be created without using a project template. All other work should reference your office's own set of project templates.
Your application sign-in screen can be reached by opening the web page:
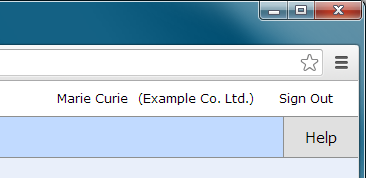
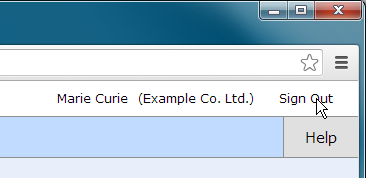
After signing in, your own name and company name can be seen at the top-right corner of every system screen:
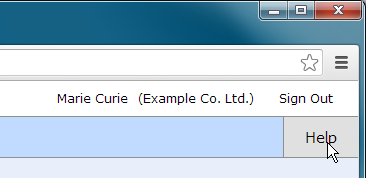
The "Help" button at that top-right corner can be clicked at any time to provide help for the screen you are currently viewing:
And the "Sign Out" link can be used to disconnect your Senomix session:
If you have any questions about signing in to your Senomix account, please contact us at support@senomix.com. We'll be happy to help!
Once you have signed in to Senomix Timesheets, you will be brought to your Main Menu screen. To move from your Main Menu and between system screens, click the appropriate menu or toolbar button to make your selection.
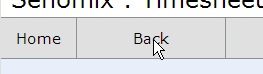
A toolbar is provided at the top of every system screen, such as this toolbar shown at the top of your Timesheet Entry screen:
Using that toolbar, you can move back one screen from your current location by clicking the "Back" button:
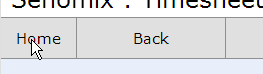
Or you can click the "Home" button to jump directly to your Main Menu screen:
To get help for the screen you are currently using, click the "Help" button:
To sign out and exit Senomix Timesheets you can click the Sign Out button at the bottom-right corner of your Main Menu screen, or click the top-right corner "Sign Out" link at any time.
You can reach your administration screens by clicking:
Management -> System Admin
That will bring you to your administration main menu:

All functionality for your administration application can be reached through this screen, with the available options to be found in the button bar at the screen's right-hand side. These buttons have the following functionality:
User Admin
Opens your User Administration screen, allowing you to add or edit user accounts.
Project Admin
Opens your Project Administration screen, allowing you to add or edit projects.
Create Report
Opens your Create Report screen, allowing you to create system reports.
Review Records
Opens your Review Records screen, from which you can retrieve timesheet and expense claim records for review, approval or editing.
Configuration
Opens your Configuration Sub-Menu screen, from which you can define project and user groups for reporting, adjust system settings, or open another menu to adjust your system's taxes, expense types and vendors, as well as copy a project's contents or reassign billing codes applied to a particular project.
App Links
Opens your App Links menu screen, which provides integration with third-party apps such as MYOB, QuickBooks and Xero.
Back
Returns you to your Management sub-menu.
Help
Opens a new web page displaying help for your current screen.
Your user administration screen allows you to create and modify Senomix user accounts for your staff. Projects can be assigned to user accounts to restrict options for time entry, and users can be assigned to an account to place those individuals in a manager's scope of responsibility for timesheet approval and reports access.
This screen is reached from your main menu.

The buttons and fields provided on this screen are as follows:
Home / Back
Exits the screen and returns you to your main menu.
New
Clears the screen to prepare it for entering a new user.
Save
Saves to your database any changes made to the selected user.
Delete
Deletes the selected user from your database.
Prev
Selects the previous user displayed in the screen's table window.
Next
Selects the next user displayed in the screen's table window.
Help
Opens a new web page displaying help for your current screen.
Employee No.
The employee number provided for the selected user account. No two users can have the same employee number assigned.
First Name
The first name of the person assigned to the selected user account.
Last Name
The last name of the person assigned to the selected user account.
Phone
The phone number of the person assigned to the selected user account.
Email Address
The email address of the person assigned to the selected user account. Used for the user account's system sign-in.
Password
The password the selected user account will use for system sign-in.
Payroll Item
The QuickBooks Payroll Item to use in exports to your office's accounting software. If you are not using the QuickBooks Online Payroll module, please leave this item blank.
User Access
The system access rights granted to the selected user account.
Available options for selection are:
Full Timesheet Access:
Provides the user account with access to all functionality in the timesheet entry application.
Stopwatch Access Only:
Limits the user account to only using the stopwatch to record their time. Access to the timesheet entry and listing screens, as well as all expense claim functionality, is blocked for these users.
A start and stop timestamp will also be automatically set in the user's stopwatch comments, with those comments blocked from the user's direct edit. The start/stop timestamp for system users can be viewed by a manager or administrator by creating a timesheet comments report.
No Time Entry Allowed:
Blocks the user from recording any time or expenses for their account. Non-time entering users are not counted towards your office's user limit.
If you have system users in your office who will only perform administrative tasks such as generating reports, approving timesheets or otherwise managing your system without recording time themselves, you can set their user account to this access right and free up their license slot for use by another of your time recording employees.
Default Rate
The default billing rate to be used when generating invoices for time recorded by the selected user account. If an employee is billed at the same billing rate for all project work, that rate should be entered here.
If an employee is charged out at a different rate for different projects, this value should be left blank, with rates specified in your project or billing rate administration screens instead.
Hours Per Week
The number of hours which the selected user account is expected to have recorded in their timesheet for a typical work week. Used to determine whether a person's timesheet is incomplete for purposes of sending automated e-mail reminders, identifying overtime in a spreadsheet report, or generating an incomplete timesheets report.
If this field is left blank, the Hours in Week value entered in your application settings screen will be used to determine the user's expected work week. An hours value should only be entered in this field if an employee has a non-standard work week. For example, an employee working part time and expected to record only 16 hours per week would have "16" entered in this field.
User Id
Displays the system-assigned id of the selected user.
Active
A checkbox which indicates whether or not the displayed user account is allowed to connect to your Senomix system. If a user's system access needs to be temporarily suspended, but their account will be reactivated at some point in the future, this checkbox can be used to handle that temporary suspension of system access.
A user account which has been set to a temporarily inactive state will still count against your office's recorded quantity of system users. To permanently inactive a user to remove them from your account total while still keeping all timesheets and expense claims for reference, you will want to set that user to be historic (as described below).
Administrator
A checkbox which indicates whether or not the displayed user account has access rights to your administration application.
A user with administrative rights will automatically have full access to all system reports (both through your administration and reports applications), and so reports access for an administrative user will be fixed at "Full Reports Access".
Reports Access
The reports access rights granted to the selected user account. User accounts with administrative rights are automatically granted full reports access, with the default for new user accounts being no access to system reports.
Non-administrative users with an assigned level of reports access can sign in to their reports application through the system sign-in screen.
Available options for selection are:
Full Reports Access:
Provides the user account with access to all system reports. This is the same level of reports access which an administrative user has available through their administration application.
Non-Financial Reports Only
Provides the user account with access to all system reports, with the exception of those provided under the "Financial" and "Data Export" panels of the report creation screen.
Personal Reports Only
Provides the user account with access to non-financial system reports, restricted to the user's own recorded information (the data of other users is not available to Personal Reports users).
No Reports Access
Blocks the user account from all system reports. Sign-in to the reports application is not allowed for these user accounts.
For Full and Non-Financial reports access, if a user account has user records assigned to them (through the "Assigned Users" button, described below) the user account will only be provided with reports access to the data of system users noted as being in their scope of responsibility. If no users are assigned to a user account, all recorded data will be available for their reports. Similarly, a user account with projects assigned to them will have their report data limited only to those projects to which they have been provided access.
An administrative user will always have access to all project and user account data for their reports, regardless of project assignment or employees who may be assigned to them for purposes of timesheet approval.
Assigned Projects
Opens the assigned projects screen, displaying the project assignments for the selected user.
A user account with projects assigned to them will have their timesheet and expense claim entry options limited only to the projects to which they have been assigned. If the user account has been provided with reports access, their reports will also be limited to their assigned projects.
Assigned Users
Opens the assigned users screen, displaying the user assignments for the selected user.
A user account with user records assigned to them is considered to have those system users in their scope of responsibility and so can approve timesheets created by those users. If the user account has full or non-financial reports access, they will also be able to create reports for data entered by those users set in their scope of responsibility.
Time Estimates
Opens the time estimates screen for the selected user, displaying (and allowing edit of) all time estimates entered by that employee for their planned work.
Billing Rates
Opens the billing rate administration screen, displaying all billing rates related to the selected user.
Create Timesheet
Opens the create timesheet screen, allowing a blank past or future timesheet to be created for the selected user.
If a timesheet more than ten weeks in the past or future needs to be created for a system user, that record can be created through this screen. For timesheets required within ten weeks of the current date, the off-week filing screen provided in the user's own time and expense entry application can be used to create missed past or pre-filed future timesheets.
Create Expense Claim
Opens a new expense claim for the selected user, allowing an administrator to enter expense claim data for the employee.
Expense claims can also be directly entered by a user through the expense claim entry screen provided in their time and expense entry application.
Clear Account 2FA
Clears two-factor authentication for the selected user.
If a user has lost their authenticator app entry for Senomix Timesheets, clearing 2FA will allow them to sign in.
(Please note: 2FA is only available for hosted Senomix plans)
Send Welcome Email
Sends an invitation message to the email address set for the currently selected user. This provides the employee with their connection information (with the exception of their password, which is not safe to send via email) and a link to their sign-in page.
Set Historic
Sets the displayed user to have a historic state (as described below). Setting a user to be historic permanently inactivates the user account and removes them from your system's registered user count while keeping all of their timesheets and expense claims for reference.
If a user account has already been set to a historic state, this button will be shaded red and have the label "Historic".
Showing All Users / Showing Only Active
Toggles the display of user records to only show user accounts which are active, or to show both active and inactive users.
To display all users which are active, inactive or set to a historic state, toggle this button to read "Showing All Users".
The table window in your user administration screen can be set to display records in order by last name, first name or employee number by clicking the corresponding table header.
A user record cannot be deleted if it is referenced in your system in timesheets or expense claims (either with that user account having entered timesheets or expense claims themselves, or having approved records for others). If a user account is associated with your system's timesheet or expense claim information, all timesheets and claims associated with that individual must first be deleted before that user can be removed.
Instead of deleting a user record, it is recommended that the user be set to a historic status instead. Setting a user to be historic permanently inactivates their account and frees up their license space in your system (so you can add another user in their place) while keeping all of their entered timesheet and expense claim information. Once a user has been set as historic, no further timesheets or expense claims can be created for that individual, and all of their existing records will be permanently blocked from edit.
Only users who have permanently left your organization should be made historic. Once a user has been made historic, the record cannot be reverted to a non-historic state through your administration application. However, Senomix Support can change a historic user's status for you if you would like to reverse that account's permanent inactivation and return them to active use. To reverse a historic user's status, please contact Senomix Support for assistance at support@senomix.com.
To set a system user to be historic, select their record and click the "Set Historic" button. Once that button has been clicked, a confirmation message will be displayed:
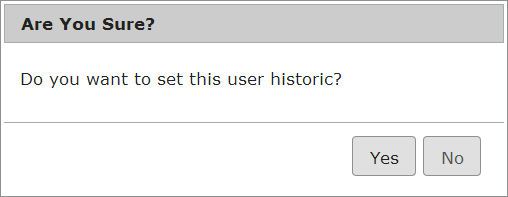
Clicking yes on that confirmation will display a secondary confirmation message, which reminds you that setting a record to be historic is not a reversible action:
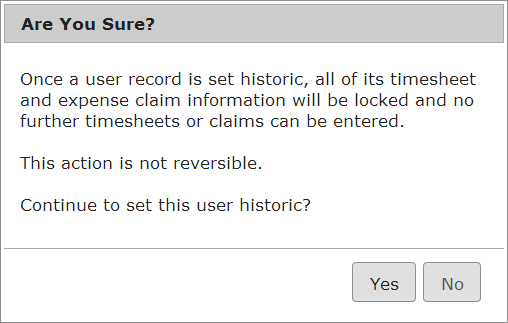
After clicking yes on that secondary confirmation message, the displayed user record will be set as historic, with all of their timesheet and expense claim information locked from edit. The user administration screen will also be made non-editable for that user's account, with the set historic button changing to an alert shade of red to indicate the record's historic state.
Your assigned projects screen allows you to specify the projects to which an employee will be limited for their time and expense entry. If no projects are assigned to an employee, they will be able to reference any active projects in their timesheets or expense claims.
If an employee's user account has been granted reports access, assigning projects to that employee will also limit them to creating reports only for those projects to which they have been assigned. An employee with reports access will be able to reference any project in their reports if they have not had specific projects assigned to them.
An administrative user signed in to their administration application will always be able to access all projects for their reports. Project assignment only limits access for timesheets and expense claims in the time and expense entry application, or report creation through the reports application.
If no projects are assigned to an employee's user account, and that employee's user account has been granted reports access, that person will be able to create reports for all system projects by default. Adding specific projects to a managerial employee's assigned projects will ensure that only information for those projects will be available through their reports application.
This screen is reached from your user administration screen.

The buttons and fields provided on this screen are as follows:
Home
Exits the screen and returns you to your main menu.
Back
Exits the screen and returns you to your user administration screen.
Reset
Resets the displayed table windows for projects 'not assigned' and 'assigned to' to the last point at which the assigned projects were saved.
Save
Saves in the noted employee's set of assigned projects all projects listed in the "Projects Assigned to" table.
Help
Opens a new web page displaying help for your current screen.
Assigning To
The name of the employee to whom projects are being assigned.
Projects Not Assigned
Lists all projects which are not assigned to the noted employee.
Projects Assigned to
Lists all projects assigned to the noted employee.
Add
Adds the project selected in the "Projects Not Assigned" table to the "Projects Assigned to" table.
Add All
Adds all projects listed in the "Projects Not Assigned" table to the "Projects Assigned to" table.
Remove
Removes from the noted employee's assigned projects the project selected in the "Projects Assigned to" table.
Remove All
Removes all projects from the noted employee's assigned projects.
Your assigned users screen allows you to designate employee user accounts to be in the scope of responsibility of another employee. A system user with employee accounts placed in their scope of responsibility can review and approve timesheets for those employees (through their approve timesheets screen), or have their reports (through the reports application) limited only to the users assigned to them.
An administrative user signed in to their administration application will always be able to access all user accounts for reports and timesheet approval. User assignment only limits access for timesheet approval in the timesheet entry application, or report creation through the reports application.
If no users are assigned to an employee's user account, and that employee's user account has been granted reports access, that person will be able to create reports for all system users by default. Adding specific user accounts to a managerial employee's assigned users will ensure that only information for those users will be available through their reports application.
This screen is reached from your user administration screen.

The buttons and fields provided on this screen are as follows:
Home
Exits the screen and returns you to your main menu.
Back
Exits the screen and returns you to your user administration screen.
Reset
Resets the displayed table windows for users 'not assigned' and 'assigned to' to the last point at which the assigned users were saved.
Save
Saves in the noted employee's set of assigned users all employees listed in the "Users Assigned to" table.
Help
Opens a new web page displaying help for your current screen.
Assigning To
The name of the employee to whom user accounts are being assigned.
Users Not Assigned
Lists all user accounts which are not assigned to be in the noted employee's scope of responsibility.
Users Assigned to
Lists all user accounts assigned to be in the scope of responsibility for the noted employee.
Add
Adds the user record selected in the "Users Not Assigned" table to the "Users Assigned to" table.
Add All
Adds all user records listed in the "Users Not Assigned" table to the "Users Assigned to" table.
Remove
Removes from the noted employee's assigned users the user record selected in the "Users Assigned to" table.
Remove All
Removes all user records from the noted employee's assigned users.
Your time estimates screen allows you to review the time estimates entered by an employee for their planned work. The items listed in this screen can be edited and re-saved to adjust the employee's provided work estimates.
This screen is reached from your user administration screen after selecting the user record of interest and clicking the "Time Estimates" button to retrieve the selected employee's estimates.

The buttons and fields provided on this screen are the same as those available in the time estimates screen of your time and expense entry application.
Your create timesheet screen allows you to create a timesheet for an employee who may have missed time entry for a past week.
Since timesheet records are automatically created whenever a user saves their time, and since past and future timesheets can be created by employees by moving forward or back in weeks from their timesheet screen, this screen should only be needed in exceptional situations (such as if a timesheet was noticed to be missing for a week ending date many months in the past).
This screen is reached from your user administration screen:

The buttons and fields provided on this screen as follows:
Home
Exits the screen and returns you to your main menu.
Back
Exits the screen and returns you to your user administration screen.
Clear
Clears the week ending date field, allowing you to select a new date for timesheet creation.
Create Record
Creates a new timesheet for the selected employee using the week ending date provided.
Help
Opens a new web page displaying help for your current screen.
Employee No.
Displays the employee number of the employee whose user account is selected.
Employee Name
Displays the name of the employee whose user account is selected.
Week Ending Date
Allows you to choose the week ending date for the timesheet to be created for the selected employee.
After selecting the week ending date for the timesheet you would like to create, click the Create Record button. You will then be prompted to confirm the week ending date of the timesheet to be created:

After confirming the timesheet week ending date is correct, click the Yes button to create the missing record. Notice of the timesheet's successful creation will then be shown:

If a timesheet already exists for your chosen user and week ending date, your new record creation will be blocked. If your intended timesheet already exists, you will want to examine that record through your timesheet administration screen rather than attempting to create it here.
Your billing rate administration screen shows all non-default billing rates to be applied to an employee's recorded time. Rates entered in this screen override the default rates set for projects and employee user accounts.
This screen is only needed if an employee will have a different billing rate than that set for the project or for their default rate. If all employees assigned to a project will be billed out at the same hourly rate, or if you will not be using Senomix for the calculation of client billing, you will not need to use this screen.
This screen is reached from your user administration screen and will display only those billing rates assigned to the selected user.

The buttons and fields provided on this screen are as follows:
Home
Exits the screen and returns you to your main menu.
Back
Exits the screen and returns you to your user administration screen.
New
Clears the screen to prepare it for entering a new billing rate.
Save
Saves to your database any changes made to the selected billing rate.
Delete
Deletes the selected billing rate from your database.
Prev
Selects the previous billing rate displayed in the screen's table window.
Next
Selects the next billing rate displayed in the screen's table window.
Help
Opens a new web page displaying help for your current screen.
Employee Name
The name of the employee to whom the displayed billing rates apply.
Employee No.
The employee number of the employee to whom the displayed billing rates apply.
Project
The project to which the displayed billing rate is to be applied.
Activity
The activity to which the displayed billing rate is to be applied.
Task
The task to which the displayed billing rate is to be applied.
Rate
The per-hour rate to be applied to the displayed project, activity and task.
Billing Rate Id
Displays the system-assigned id of the selected billing rate.
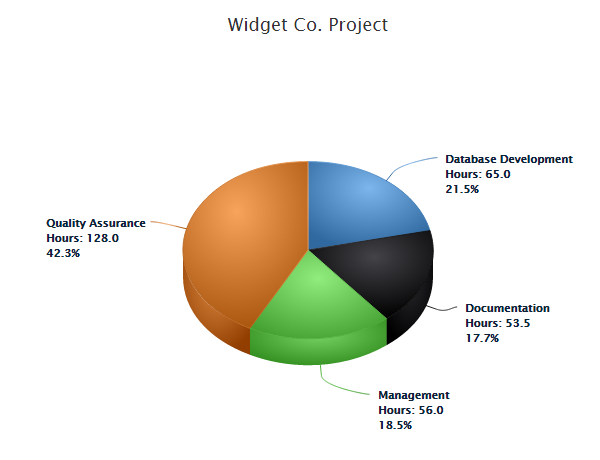
If a billing rate is saved for a project, activity, and task, that rate will be applied to any time recorded against those items when an invoice or other billing report is created for an employee's time. For example, considering the rates shown in the screen above, any time which Ada Byron recorded to the Widget Co. Project would be charged at the rate of 75.00 dollars (or pounds, euros, etc. as appropriate) per hour booked to any Widget Co. Project activity or task, except for the Widget Co. Project Documentation activity, for which the rate would be 25.00 per hour.
If no specific billing rates were entered for Ada Byron, her time would be charged at the default rate set for the Widget Co. Project (as described for the project administration screen in Section 3.8) or the default rate set for her in her user account (as described for the user administration screen in Section 3.2).
Billing rates are prioritized in your system as follows:
Specific rates entered for an employee in the billing rates screen
[are used before]
User account default rates
[are used before]
Project default rates
If a billing rate is set for a user and project in the billing rate administration screen, that rate will have priority above all default rates.
If an employee has a default rate set in their user account and has recorded time to a project which also has a default rate, the default user account rate will be used when creating invoices and other reports.
If an employee does not have a default rate set in their user account and does not have a billing rate noted for a project in their billing rate administration screen, the default rate set for the project will be used when creating invoices and other reports.
Your project administration screen allows you to create and modify projects for use in recording time and expenses. Each project should represent a distinct piece of contracted or deliverable work (for example, a particular software project, an ad campaign, an architectural fit-up), or an on-going relationship with a client if your work does not have a distinct completion date (for example, facilities maintenance, building security, or consulting services for a particular company).
This screen is reached from your main menu.

Individual projects can be grouped together for reporting and record querying purposes as Project Groups (as described in Section 3.21 of this guide). For example, all projects related to a particular client could be referenced together under a project group with that client's name.
An internal Administration project can also be used to record all non-billable items which will occur during the course of your staff work. For example, time off for vacation, sick time, internal meetings, or non-billable travel time could all be recorded under a single Administration project used by your company.
Activities and tasks for a project can be defined as distinct items which are referenced only by that one project (for example, an internal Administration project acting as the only project under which time off for vacation or illness is recorded, or a bespoke project which requires a distinct type of work not seen elsewhere in your organization) or as shared items which are recorded in a Project Template and applied to all projects of a certain type.
As described in section 1.1.1, project templates allow you to define a common set of activities and tasks which can be assigned to a project of a certain work type. For example, you could create a project template which held the activities and tasks related to all of your consulting engagements, or one which related to surveying jobs pursued by your organization.
A change made to a project template will be immediately reflected in the activities and tasks of all projects to which that template has been assigned, providing you with an easy way to update the structure of your work as products and services are added to your organization over time.
The buttons and fields provided on this screen are as follows:
Home / Back
Exits the screen and returns you to your main menu.
New
Clears the screen to prepare it for entering a new project.
Save
Saves to your database any changes made to the selected project.
Delete
Deletes the selected project from your database.
Prev
Selects the previous project displayed in the screen's table window.
Next
Selects the next project displayed in the screen's table window.
Help
Opens a new web page displaying help for your current screen.
Project Name
The name of the project. This will be the name by which the project is referred to by your organization.
Project Code
The internal project code which your organization uses to refer to this project.
Mail Address
A button which opens an edit screen in which you can enter the mailing address of the selected project.
Active
A checkbox which indicates whether or not the displayed project is active and available for recording time and expenses. Only active projects are available for reference in user timesheets and expense claims (all projects are always available through edits made in your administration application).
Template Used
A selector used to identify the project template in use, or to show that no template is used (with the project having distinct activities and tasks not referenced by any other projects). Once a template has been set for a project, it cannot be changed.
Templates
A button which leads to your Template Administration screen, allowing you to create project templates which contain the activities and tasks used in the various types of work engaged in by your organization.
Default Rate
The billing rate to be applied to any time recorded to this project in system timesheets. This value is used for billing calculations (such as invoice generation) and represents the dollars (or pounds, euros, etc.) billed for each hour of project work. If you will not be tracking billing for this project, or if you will be creating distinct billing rates for each employee involved in the work, this item can be left blank.
This rate can be overridden by entering a billing rate for a specific Senomix user in their user account settings, or by creating a billing rate entry for this project and a specific user in your Billing Rate Administration screen.
Apply [taxes]
Checkboxes which indicate which of the four available taxes defined in your Senomix system should be applied to this project. The names and rates of these taxes can be defined through your Tax Administration Screen, with the default items provided with Senomix being defined as GST, PST, HST and VAT.
Project Id
Displays the system-assigned id of the selected project.
Est. Hours
The number of hours which the selected project is estimated to require for completion. This value can be used in various estimates vs. actuals and work in progress reports to track a project's progress against baseline time estimates.
Two fields are displayed on this line: An enterable value which indicates the total number of hours estimated for the project to be completed, and a non-enterable value which displays the total of estimates entered for the project and for all of its activities and tasks.
As described in the Activity and Task administration screens, time estimates can be entered for each component of work if a more granular set of time estimates are desired. Any value entered in the editable estimate field will be added to the activity and task estimate totals displayed in the non-enterable field. If estimate hours are not entered for any activities or tasks in the project (as would be the case when using an assigned project template), the non-editable total field will display the same value as that entered in the editable est. hours field.
Est. Complete
Displays the date on which the project is estimated to be complete. This value can be used in system reports, such as your Work in Progress report, to identify the status of your organization's work schedule.
Activities
A button which leads to your Activity Administration screen, displaying all activities assigned to the selected project. If the selected project has a template assigned, this button will be disabled (since no project-specific activities will be available).
A template's activities can be reviewed by clicking this screen's Templates button and selecting the project template of interest.
Showing All Projects / Showing Only Active
Toggles the display of project records to only show projects which are active, or to show both active and inactive projects.
To display all projects, toggle this button to read "Showing All Projects".
The table window in your project administration screen can be set to display records in order by Project Code or Project Name by clicking the corresponding table header.
A project record cannot be deleted if it is referenced in your system in timesheets or expense claims. If a project is referenced in your system's timesheet or expense claim information, all timesheets and claims associated with that project must first be edited to remove the project before the project can be deleted. Rather than deleting a project once it has been completed, it is best to simply inactivate it to remove it from selection in user timesheets.
Your template administration screen provides a listing of all project templates which can be assigned to your Senomix projects. Each of your project templates will contain a set of activities and tasks which are common to the particular type of work identified.
For example, an 'Analysis Work' template may contain a variety of activities and tasks related to client interviews, documentation and deliverable reports. A 'Development Work' template may contain activities and tasks related to the creation of a particular type of application or physical construction.
Project templates allow you to create centralized sets of activities and tasks which can be assigned to multiple projects and managed from one location. As activities and tasks are added, edited or renamed in your templates, those changes will automatically appear in all projects which are assigned to use those templates.
This screen is reached from your project administration screen.

The buttons and fields provided on this screen are as follows:
Home
Exits the screen and returns you to your main menu.
Back
Exits the screen and returns you to your project administration screen.
New
Clears the screen to prepare it for entering a new template.
Save
Saves to your database any changes made to the name of the selected template.
Delete
Deletes the selected template from your database.
Prev
Selects the previous template displayed in the screen's table window.
Next
Selects the next template displayed in the screen's table window.
Help
Opens a new web page displaying help for your current screen.
Template Name
The name of the template. This should reflect the type of work covered by the template's activities and tasks.
Activities
Opens your activity administration screen, through which all activities and tasks assigned to the selected template can be adjusted.
Template Id
Displays the system-assigned id of the selected template.
You can assign your templates to your projects through the "Template Used" selector in your Project Administration screen. Once a template has been assigned to a project, all activities and tasks in the assigned template will be made available for use in that project.
The activities and tasks in a particular template can be reached by selecting the template of interest and clicking the 'Activities' button. A change made to the activities or tasks in a particular template will be automatically applied to all projects which reference that template.
If a template is assigned to one or more projects in your system, that template cannot be deleted.
Your activity administration screen allows you to create and modify activities belonging to a project or project template. The activities created in this screen will be made available in your system timesheets and expense claims under the project or project template in which they have been created.
This screen is reached from your project or template administration screen.

The buttons and fields provided on this screen are as follows:
Home
Exits the screen and returns you to your main menu.
Back
Exits the screen and returns you to your project or template administration screen.
New
Clears the screen to prepare it for entering a new activity.
Save
Saves to your database any changes made to the selected activity.
Delete
Deletes the selected activity from your database.
Prev
Selects the previous activity displayed in the screen's table window.
Next
Selects the next activity displayed in the screen's table window.
Help
Opens a new web page displaying help for your current screen.
Selected Project /
Selected Template
The name of the project or project template to which the displayed activities belong.
Activity Name
The name of the activity. This will typically be the type of work against which time will be recorded at your office (for example, a general category such as 'Development', 'Maintenance', 'Documentation' or 'Quality Assurance').
Activity Code
The internal activity code which your organization uses to refer to this category of work. If activity codes are not used by your office, any unique value or number can be entered here.
Active
A checkbox which indicates whether or not the displayed activity is active and available for recording time and expenses. Only active activities are available for reference in user timesheets and expense claims (all activities are always available through edits made in your administration application).
Activity Id
Displays the system-assigned id of the selected activity.
Est. Hours
The number of hours which the selected activity is estimated to require for completion. This value can be used in various estimates vs. actuals and work in progress reports to track a particular activity's progress against baseline time estimates.
Estimated hours are only displayed for 'standard' projects. Activities entered under a project template will not display estimated hour or estimated completion date values.
Two fields are displayed on this line: An enterable value which indicates the total number of hours estimated for the activity to be completed, and a non-enterable value which displays the total of estimates entered for the activity and for all of its tasks.
As described in the Task administration screens, time estimates can be entered for each component of work if a more granular set of time estimates are desired. Any value entered in the editable estimate field will be added to the task estimate totals displayed in the non-enterable field. If estimate hours are not entered for any tasks in the activity, the non-editable total field will display the same value as that entered in the editable est. hours field.
A value is only required in the activity's estimated hours field if you believe hours will be billed at the activity level of your project. If time is only expected to be recorded by employees at the task level of your project, estimated hours should be left for individual tasks.
Est. Complete
Displays the date on which the activity is estimated to be completed. This value can be used in system reports, such as your Work in Progress report, to identify the status of your organization's work schedule.
Estimated completion dates are only displayed for 'standard' projects. Activities entered under a project template will not display estimated completion date or estimated hour values.
Tasks
A button which leads to your Task Administration screen, displaying all tasks assigned to the selected activity.
Tasks displayed after clicking this button will only appear beneath the selected activity. To create tasks which will appear for all activities in your project template, use the Tasks For All Activities button.
Tasks For All Activities
A button which leads to your Task Administration screen, displaying tasks which are to be assigned to all activities in the template.
If you have tasks which you would like to see appear under all activities in your project, use this button to access that universal task list.
This option is only available for project templates (not 'standard' projects).
Showing All Activities / Showing Only Active
Toggles the display of activity records to only show activities which are active, or to show both active and inactive activities.
To display all activities, toggle this button to read "Showing All Activities".
The table window in your activity administration screen can be set to display records in order by Activity Code or Activity Name by clicking the corresponding table header.
An activity record cannot be deleted if it is referenced in your system in timesheets or expense claims. If an activity is referenced in your system's timesheet or expense claim information, all timesheets and claims associated with that activity must first be edited to remove the activity before it can be deleted. Rather than deleting an activity once it has been completed, it is best to simply inactivate it to remove it from selection.
Your task administration screen allows you to create and modify tasks belonging to a project or project template's activities. The tasks created in this screen will be made available in your system timesheets and expense claims under the project or project template activity in which they have been created or (if called using the Tasks For All Activities button) for all activities in your project template.
This screen is reached from your activity administration screen.

If your tasks are to be available for a particular activity only, you will see the name of that activity noted in the "Selected Activity" field. In the screen shown above, the displayed tasks will appear beneath the "Design" activity only.
If your tasks are to be available for all activities in your project template, the text "ALL ACTIVITIES" will be shown in the "Selected Activity" field.
The buttons and fields provided on this screen are as follows:
Home
Exits the screen and returns you to your main menu.
Back
Exits the screen and returns you to your activity administration screen.
New
Clears the screen to prepare it for entering a new task.
Save
Saves to your database any changes made to the selected task.
Delete
Deletes the selected task from your database.
Prev
Selects the previous task displayed in the screen's table window.
Next
Selects the next task displayed in the screen's table window.
Help
Opens a new web page displaying help for your current screen.
Selected Project /
Selected Template
The name of the project or project template to which the displayed tasks belong.
Selected Activity
The name of the activity to which the displayed tasks belong, or the text "ALL ACTIVITIES" if the listed tasks are to appear in all activities in the selected project template.
Task Name
The name of the task. This will typically be the lowest detail level at which time will be recorded at your office (for example, a specific work item such as 'Database Design', 'Documentation Review', 'Painting', 'Delivery', 'Client Meetings', etc.).
Task Code
The internal task code which your organization uses to refer to this item of work. If task codes are not used by your office, any unique value or number can be entered here.
Active
A checkbox which indicates whether or not the displayed task is active and available for recording time and expenses. Only active tasks are available for reference in user timesheets and expense claims (all tasks are always available through edits made in your administration application).
Task Id
Displays the system-assigned id of the selected task.
Est. Hours
The number of hours which the selected task is estimated to require for completion. This value can be used in various estimates vs. actuals and work in progress reports to track a particular task's progress against baseline time estimates.
Estimated hours are only displayed for 'standard' projects. Tasks entered under a project template will not display estimated hour or estimated completion date values.
Est. Complete
Displays the date on which the task is estimated to be completed for your project. This value can be used in system reports, such as your Work in Progress report, to identify the status of your organization's work schedule.
Estimated completion dates are only displayed for 'standard' projects. Tasks entered under a project template will not display estimated completion date or estimated hour values.
Showing All Tasks / Showing Only Active
Toggles the display of task records to only show tasks which are active, or to show both active and inactive tasks.
To display all tasks, toggle this button to read "Showing All Tasks".
The table window in your task administration screen can be set to display records in order by Task Code or Task Name by clicking the corresponding table header.
A task record cannot be deleted if it is referenced in your system in timesheets or expense claims. If a task is referenced in your system's timesheet or expense claim information, all timesheets and claims associated with that task must first be edited to remove the task before it can be deleted. Rather than deleting a task once it has been completed, it is best to simply inactivate it to remove it from selection.
Your create report screen allows you to create reports for the review and analysis of your office's recorded timesheet and expense claim information.
This screen is reached from your administration or reports application's main menu screen:

The buttons and fields provided on this screen as follows:
Home / Back
Exits the screen and returns you to your main menu screen.
Clear
Clears all report filter elements, resetting the report filter to that set for your chosen report.
Create Report
Requests a report with the report filter and output options you have selected.
Help
Opens a new web page displaying help for your current screen.
Report Review
Created Web Page reports will be opened for display in your Report Review screen. In that screen, you can choose to save your report to your computer's hard drive by clicking the green "Save to Disk" button:
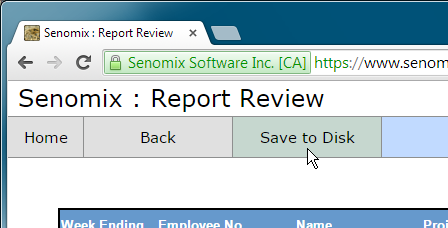
After clicking the "Save to Disk" button, your report will be saved to your computer's Downloads folder and be available for your review in a new web browser window. Depending upon your web browser's behaviour for saving files, you may be presented with a "Save As" dialog box, a "File Saved" notification or, as with Mac OS X Safari, your file may be silently saved to your computer without showing any notification message at all.
Using Mac OS X Safari?
Please note: The Safari web browser provided with Mac computers
will save your reports to your Downloads folder
without displaying a confirmation message.
After selecting 'Save to Disk' or creating an export report,
you will be able to find your saved report files in your Downloads folder.
When creating a report for Microsoft Excel, your report will be saved to your computer's Downloads folder with the name of "senomixReport.xls" and (for the behaviour of most web browsers) be automatically opened in Excel for your review.
When creating data export reports, your report will be automatically saved to your computer's Downloads folder in the file format expected for that export. The filename used for your report will describe its contents.
As reports are saved, they will be numbered for you (for example, "senomixReport (12).xls") in the order they are created. You can rename your saved reports as you would like, and we recommend deleting old reports from your Downloads folder or moving them to your personal directories once they are no longer required for your immediate reference.
Report Type
The report type section of your screen:

Allows you to choose the report you would like to create and the format in which it will be created. Reports can be created as html web pages or as formatted Microsoft Excel spreadsheets (the option to which these buttons are reset to can be chosen in your application settings screen). Data export reports will always be created as plain text before being saved to your computer's Downloads folder.
Report options for timesheet or expense claim records are available, with available categories of analysis, estimate, financial, and export reports providing a list of available reports in the rightmost selector.
The reports listed will change depending upon the report type and category you have chosen, with the reports covering data analysis, estimate, etc. as appropriate for your selection.
If your reports access rights are restricted to non-financial or personal reports, the reports available to you will be limited accordingly. For example, if your user account was set to have access only to non-financial reports, expense claims would not be available for your reports, and timesheet report options for financial and export reports would also be blocked from your use.
If a report option does not require a particular report filter item, those selection options will be disabled when your report is selected. For example, an Incomplete Timesheets report has no need for the employee, user group, project group, billing code or billable state selectors, and so those items will be cleared and disabled for that report option.
The options for chart reports allow you to add options for saving the chart images (for example, if you wished to save a chart for attachment within an offline document) or adjusting its colours and orientation to provide a more presentation-friendly appearance. These options are only enabled when a chart report has been selected.
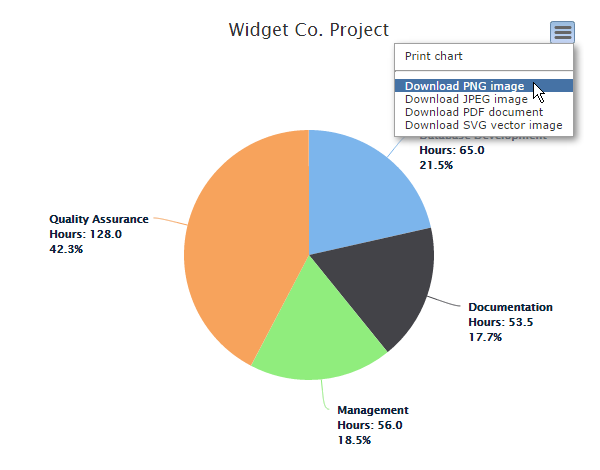
The Enable Chart Save option will add a save widget to each chart presented in your chart review screen, providing a selection menu which will allow you to print or save the chart image as you would prefer:
The Chart Shaded Colours option will add a gradient fill shading to your charts:
With the Draw 3D Charts option displaying your output with a 3D orientation (only available for pie charts):
Examples of all reports provided through these options can be found later in this section, with chart examples provided in the chart review screen section which follows.
Report Filter
The report filter section of your screen:

Allows you to refine the data which will appear in your report by specifying date ranges, groups of employees, particular projects, or shared project codes as suits your preference. For example, you could request a report which displays all Analysis work performed by your Engineering group of employees for all work related to the Widgets Inc. company for the month of July.
A description of each of these filter elements, along with examples of how and why you might use them, are described below.
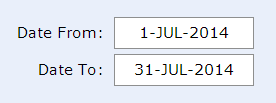
Date From / Date To
What this does:
The Date From / Date To filter allows you to set a distinct date range for your reports. For example, selecting the dates 1-Jul-2014 and 31-Jul-2014 would result in your report containing time or expenses recorded within the month of July, 2014:
Please note: All reports consider the individual timesheet or expense claim item dates when creating their output, with the exception of the Expense Claim Listing report and all Expense Claim Data Export reports. Those reports use the Claim Date for determining which expense claim records to include in the report output and do not consider the dates of the individual expense claim items.
Why you would use this option:
Almost all reports you will want to create will cover only a certain time period of interest (for example, all time for a certain month). The Date From / Date To filter allows you to specify the date range of interest to you.
If either of the Date From or Date To filters are left blank, all time or expenses on or after, or on before the specified date will be included in your report. For example, setting a Date From of July 1st, 2014 and leaving the Date To blank:
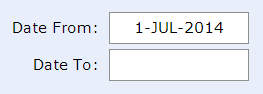
Would result in your report including all time or expenses which were recorded as occurring on or after July 1st, 2014.
If both the Date From and Date To filters are left blank, your report will contain all hours or expenses for all time.
Date Preset
What this does:
The Date Preset buttons allow you to set the Date From and Date To filters with a single button click.
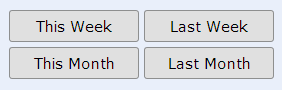
For example, if the date 'today' was July 19th, 2014, when the This Month button was clicked, the Date From and Date To filter would be set for the month of July, 2014:
Why you would use this option:
Your date presets provide a quick way to set recent date ranges of interest.
Employee
What this does:
The Employee filter allows you to set your report to only include time or expenses entered by a particular employee. For example, selecting the employee "Ada Byron":

Will result in your report only containing hours or expenses which have been entered in Ada's timesheets or expense claims
Why you would use this option:
If you wanted to create a report which only showed the time or expenses recorded by a single employee.
User Group
What this does:
The User Group filter allows you to set your report to only include time or expenses entered by a particular group of employees. For example, if a User Group named "Development Team" was created in your system which included the employees Ada Byron, Tycho Brahe and Geoff MacKay, selecting that User Group:

Would result in your report only containing time or expenses entered for those three employees in the "Development Team" group.
Why you would use this option:
User Groups allow you to create reports which reflect the effort of an identified group of employees. For example, if you were interested in reviewing how time was spent by the administrative staff of your office.
Project Group
What this does:
The Project Group filter allows you to set your report to only include time or expenses recorded to a particular group of projects. For example, if a Project Group named "Projects for Widgets Inc." was created in your system which included the projects for "Widget Co. - Data Management System", "Widget Co. - Quality Assurance Analysis" and "Widget Co. - Systems Analysis", selecting that Project Group:

Would result in your report only containing time or expenses entered for those three projects in the "Projects for Widgets Inc." group.
If your report is filtered to include a project group, the group's name will be attached to your report's title (for example, "Work in Progress Report - Projects for Widgets Inc.").
If you are using a project group to filter your report, the Billing Code filter option for "The selected project only" (as described below) cannot be used (though you can use the "All with this activity" and "All with this task" options). If a specific project is of interest to you, it should be added to your preferred project group.
Why you would use this option:
Project Groups allow you to create reports which consolidate the hours and expenses recorded for multiple projects. If there are a number of projects for which you would like to see the effort hours or expenses collected together, you can accomplish that by using a Project Group.
For example, if all work of a certain type (systems analysis, advertising, maintenance work, etc.) was of interest, a project group which contained projects of that type could be created. Similarly, project groups can be created to categorize projects performed for different clients (for example, all work performed for the "Widgets Inc." company, as shown above), or for projects which were found to be of internal project management interest (for example, work which was performed ahead of or behind schedule).
Billable Items To Include
What this does:
The Items To Include filter allows you to specify whether the time and expenses included in your report are only for billable items, only for non-billable items, or are for both billable and non-billable items. For example, to create a report which included only time or expenses indicated as being billable, the following filter option would be set:
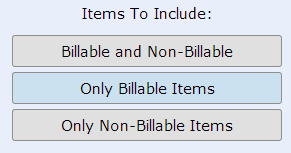
If a report is filtered as only including billable or only including non-billable time, a note will be attached to the report's title indicating that the report is for "Billable Work Only" or "Non-Billable Work Only", respectively. If both "Billable and Non-Billable" items are included, no indicating text will be added to your report's title.
For invoice reports, a note that the invoice is for "Non-Billable Work Only" will be added to the project name listed on the invoice if the "Only Non-Billable Items" option is chosen. A regular invoice for billable work will have no further clarification added.
Why you would use this option:
The Billable Items to Include filter allows you to create reports which include only billable or only non-billable time or expenses, allowing you to see how much time or expenses have been recorded in your projects for each option. This filter can be disregarded by keeping it at the "Billable and Non-Billable" option (so, including all expenses and effort hours regardless of whether or not time or expenses were recorded as being billable).
Billing Code / Show Items For
What this does:
The Billing Code and Show Items For options are used together to identify the project, activity or task of interest for your report.
For example, if you were interested in viewing the work recorded on the Widget Co. Project's Analysis activity for Client Interviews, those items would be set in your Billing Code selectors:

Your Show Items For option identifies how your chosen Billing Code is to be used for filtering your report data.
If you would only like to see only time or expenses entered for the selected billing code (for this example, only items which have been recorded to "Widget Co. Project - Analysis - Client Interviews"), the option for "The selected project only" should be chosen. This indicates that your report will only include items for the billing code entered, with all other data excluded from your report.
For example, if you wanted to see all time recorded to the Analysis activity of the Widget Co. Project (so, include all tasks listed under that activity, in addition to any time billed to the activity itself), you would select:

And to see all time or expenses to the Widget Co. project, regardless of the activity or task under which they were recorded, you would select the project of interest while setting the Show Items For filter to indicate "The Selected Project Only":

If you wanted to retrieve all time or expenses recorded to a specific activity, regardless of the project under which those items have been recorded, you would select the "All with this activity" option, as with this example:

A report created with this filter option set would include all items recorded to the "Analysis" activity, regardless of the project under which that work had been recorded. For example, if "Analysis" was used in work for the projects "Widget Co. - Data Management System", "Widget Co. - Quality Assurance Analysis" and "Widget Co. - Systems Analysis", all time or expenses recorded to "Analysis" for those projects would be included in the returned report.
Your reports can also be set to display items for a common task across the projects recorded in your system by using the "All with this task" option, as with this example:

Which would include all time or expenses recorded to the "Client Interviews" task, regardless of the project or activity under which that work was recorded.
Report filters for 'all activities' and 'all tasks' use the activity/task code attribute of the activity or task selected to determine if they are the same activity or task across projects (and so should be included in the report). For example, if we set Senomix to show the project/activity/task code attributes in the billing code listing and repeated one of the above examples:

We can see that the common activity code by which activities will be matched for the selection is "ANSYS". So, for the above selection, your report would include all work which has an activity with the code of "ANSYS".
For reports filtered on common activities and tasks, the name is ignored and the element of common interest is the project/activity/task code. The code attribute (which is defined in each of your project, activity and task administration screens) can correspond with an internal reference value used to record work in your office, or can be an abbreviation of the type of work recorded.
Activity and task codes will always be identical for your recorded work if a shared project template is used for the definition of your projects. If different project templates are used in your office to record time for different project types (or if projects are defined in your office with separate activity and task listings), you should ensure that codes for the same types of work are identical to allow the use of your "Show items for" option.
Why you would use this option:
You can use your Billing Code and Show Items For options to view information about specific projects, activities and tasks, reviewing the effort hour data recorded for that work. For example, a Work in Progress report created for the Widget Co. Project would allow you to see how much time was spent on various aspects of that work, and perhaps where scheduling problems may have occurred as time progressed.
As with all other report filter elements, the Billing Code and Show Items For options can be used along with other report filter elements, allowing you to view a more refined slice of recorded time and expense data. For example, you could view all Analysis work which the Engineering user group performed for all projects you have grouped together as being ahead of schedule, which might help identify if time performed in analysis had an impact in improved performance later in project work.
Formatting Checkboxes
What this does:
Your output formatting checkboxes allow you to adjust the content and appearance of some time and expense reports. If a checkbox option is disabled (such as the "Only Show Codes for Hours Billed" checkbox shown below), that option cannot be changed from its default setting for the report.

The options provided by these checkboxes are:
Include Code
Indicates whether or not your report should add the code of a project/activity/task code to the displayed output.
If selected, the code will be added to the beginning of each project, activity and task name displayed in the report, with a hyphen separating the two values.
Sort in Chronological Order
Indicates whether your report output is to be displayed in chronological order (with the checkbox set On) or reverse-chronological order (with the checkbox set Off). In cases where a report does not display records in chronological order, this option will be disabled.
Display Employee Info
Indicates whether additional employee information should be included in your report. For example, for the Project Estimates report, an additional breakout of employee information can be included in the report by setting this option On.
Only Include Active Billing Codes
Indicates whether or not your report should only contain billing codes which are listed as being active. If selected, the report will display "(active work only)" alongside the report title to indicate this active filter item.
If this checkbox is set On, the report will only list those projects, activities, or tasks which have their Active state set On.
Only Show Codes For Hours Billed
Indicates whether or not your report should show only those billing codes which have time or expenses recorded to them. If selected, your report will not display any billing codes which have zero time or expenses recorded to them (and so would be displayed as blank in your report). If not selected, your report will display all of a Project's billing codes, regardless of whether or not time or expenses have been billed to them.
Only Include Filtered
Indicates whether or not your report should only contain billing codes which correspond to the project, activity and task billing codes noted in the filter for your report.
If set On, your report will only include those entries which relate to your selected project, activity or task. The Spreadsheet Report, for example, will output all entered lines of all timesheets which include the project of interest to you unless this option is set On (in which case only the project of interest will be displayed in the timesheet listing).
If this checkbox is set Off, your report will include all entries for the records included in the result set. For example, by leaving this option Off when creating a Spreadsheet Report, you will be able to see all time recorded in weeks during which a certain project was worked upon.
User accounts can be set to have varying levels of reports access. Rather than provide an employee with full administrative rights, full, non-financial or personal reports access can be given to an employee to allow them to create reports for themselves or the staff in their scope of responsibility.
Reports access rights are set for user accounts in your user administration screen, with those access rights having the following effects in your create report screen:
Non-Financial Reports Access
If your Create Report Screen is being viewed in your reports (not administration) application, and you have your access rights set to Non Financial Reports Only, none of the Expense Claim, Financial or Data Export reports will be available.
Personal Reports Only Access
If your Create Report Screen is being viewed in your reports (not administration) application, and you have your access rights set to Personal Reports Only, reports will be fixed to only include non-financial information for your own recorded time and expenses.
Automatic Removal of Users and Projects from Reports
If your Create Report Screen is being viewed in your reports (not administration) application, and you have projects or users assigned to your user account, your reports will only include those users and projects to which you have been granted permission to access (through your user account's user and project assignments).
The exception to this rule is in the creation of a manager's timesheet or expense claim spreadsheet report, which will display the full timesheets for all individuals noted as being in that manager's assigned scope of responsibility (for that timesheet output, it is assumed that a manager can view the projects against which their reporting employees will be recording time and expenses).
If no users or projects are assigned to an individual through their user account's assignment options, and that individual has been granted reports access, they will have access to all system user and project records in their reports.
An employee with reports access rights will always be able to view their own timesheet data in their created reports.
Examples of the reports you can create in your Senomix system are summarized in this section.
Available under your Analysis category, your timesheet Spreadsheet Report provides a listing of timesheet records as they were entered by your staff.
As with your system screens, timesheet comments entered in spreadsheet reports will be displayed with a green tint on the associated hours entry, with comments included in Microsoft Excel displayed using that application's text notes. Comments in both options can be viewed through the report's tool tip text by hovering over the hours entry of interest, as with this example of a timesheet comment included in a Spreadsheet Report created in Microsoft Excel:
You can also view timesheet comments directly by creating a Timesheet Comments report.
Overtime in Spreadsheet Reports
If an employee records more time than is expected for them in a week, an Overtime line will be displayed in the Spreadsheet Report to display the total number of hours that individual has exceeded their expected time. As described under the Incomplete Timesheets report, the time which is expected for an employee each week is determined from the Hours in Week value entered in either your Settings screen or the employee's user account. Unless an employee has an Hours in Week value listed in their user record (for example, for part-time employees), the office-wide Hours in Week value entered in your settings screen will be used to determine the number of effort hours an individual is expected to enter for their weekly timesheet. The number of hours expected for each working day is determined from the Hours in Day value entered in your Settings screen.
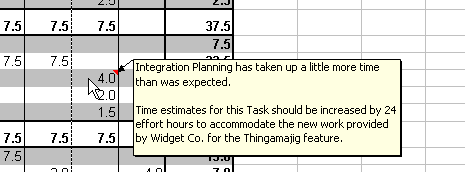
For example, if Tycho recorded 42 hours of effort during the week of September 20th, 2008 and had an expected working week of 37.5 hours (with the office having an expected working day of 7.5 hours), an Overtime row would be added to his timesheet listing in a Spreadsheet Report:

Looking at that Overtime row:
We can see that Tycho's expected 37.5 hour working week was exceeded by 4.5 hours, with more than 7.5 hours booked in the days Tuesday through Friday.
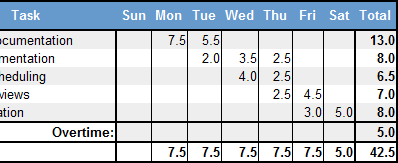
The Overtime row will only be displayed if the expected hours for the week are exceeded by the employee's total for the week. For example, if Tycho worked 37.5 hours in the following week and booked 10 hours on one day and worked a shorter 5.0 hour day the next:

Then the Overtime row would not be displayed, since Tycho has still recorded 37.5 effort hours for his week of work.
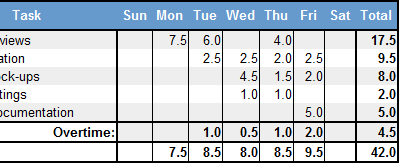
If more than the expected number of hours are worked in a given week but no one day has its effort hours exceeded, then the Overtime row will be displayed but no individual day will have overtime hours listed beneath it. In those cases, only the Total value for overtime will be displayed. For example, if Tycho worked an extra 5.0 hours on a Saturday following his regular work week of 37.5 hours, his resulting 42.5 hour work week would be shown:

So, while Tycho has recorded enough time to display a total 5.0 hours for overtime:
The working hours for the individual days of the week do not exceed the amount expected for a typical work day.
If you would prefer to have overtime hours identified as a specific activity or task for record-keeping and billing purposes, a distinct activity or task can be created for your work template as appropriate. The calculation of overtime can also be left to your office's accounting software or payroll system once the data has been transferred from Senomix, with the Overtime row of your spreadsheet report serving only to provide a summary of the extra effort recorded for a given week.
Your Timesheet Comments report provides a listing of all comment text entered on your employee timesheets, along with the associated hours entry and billing code:

Your Billable Vs. Non-Billable Hours report provides a side-by-side comparison of all time recorded for your chosen report filter. For example, a Billable vs. Non-Billable Hours report created for the "Widget Co. Project" for July 23rd, 2011 to July 29th, 2011 would appear as follows:

Clearing the blank lines from that report by using the "Only Show Codes For Hours Billed" option provides a clearer overview:

We can see the 44.5 hours of Analysis work has been recorded as non-billable, with 95.5 hours of the report remaining as billable work.
Available under your Analysis category, your Work in Progress report provides an overview of all effort hours recorded to date compared with the estimated time listed for that work (with the estimated hours displayed being those entered in the Est. Hours fields of your project, activity and task administration screens). This overview can be used to quickly identify where project effort is being directed and spot points of concern for a project. For example, a Work in Progress report listing for the Widget Co. Project:

Shows that the estimated time for Design work is not sufficient, since the time recorded to date is now more than triple the time initially estimated for that work. Similarly, time recorded to Quality Assurance is relatively low compared to its original estimate.
By regularly running Work in Progress reports and similar guides (such as the various Estimates reports), potential issues can be identified early in a project to allow you to quickly address potential points of concern.
A Project Effort Summary report contains the same information as that listed in the Project Effort report, but only displayed for a Project level of detail. For example, an office which only had work on the Widget Co. Project and Administration for the month of April, 2006 would show as follows:

This provides you with a snapshot of work performed during a time period of interest for a high-level overview of effort allocation, without providing detail information about which tasks were performed by whom.
To list a summary of the time recorded to each project, broken down by employee, a Project Effort report can be created:

In this report, the individual projects, activities and tasks are listed, along with the time which each individual employee has recorded under those items. Time for each week is listed in the displayed columns, with the total time for each of the projects, activities and tasks displayed above each set of employee effort detail rows. As with all reports, the order in which the week columns are displayed corresponds with the chronological or reverse-chronological order the user has chosen for their report formatting options.
This report can be set to show only the effort recorded for a particular project over a period of time (as shown) or can display all effort recorded for all projects. If more than one project is included in this report, the different projects will be separated with a page-break, with separate column headers displayed for each project.
Your Employee Effort report lists out the time which each individual employee has recorded. The total time recorded for each of the projects, activities and tasks are displayed on the corresponding lines, with effort hours of each activity also including the recorded effort for any sub-tasks, and project effort including all effort hours recorded for the project's activities and tasks.

Your Incomplete Timesheets report displays all timesheets which have recorded less than a full week of effort and have not yet been approved (you can declare a timesheet as 'complete', regardless of the time entered, by approving the record). This provides an easy way for you to identify any employees who may have forgotten to complete their timesheet for a given week. For example, looking at the month of April, the administrator can see that Tycho Brahe has only booked 30.0 hours for the week of April 7th, 2006:

An Incomplete Timesheets report will only display timesheets as 'incomplete' if at least one employee has provided a timesheet for that week. If no employees have yet provided timesheets for a week, it is assumed that the week lies in the future and is not to be considered. If an employee has not yet saved a timesheet at all, the hours for that week will be shown as blank, as in this example subset for the week of May 20th, 2006:

An Incomplete Timesheets report will always consider the full week of timesheet entries for the date range you have chosen. For the above example, the same result would be provided if the date range was entered as May 15th, 2006 through to May 19th, 2006. The number of hours which determines a 'full week' of time for your office is entered in the Hours In Week field of your settings screen. Any users which are expected to record less than that number of hours each week (for example, part time staff) should have their expected hours entered in the Hours Per Week field of their user account.
Your Project Estimate Summary report provides a project-level overview of all "Effort to Date" (or over an indicated period of time), the total "Estimate to Complete" which all employees have indicated as required for their work, and the "Baseline Hours" which was entered at the project level for the work. The variance between these values is then displayed in a summarizing "Hours Difference" column.
For example, looking at the month of December, 2006, the following summary report is created for our simplified two-project example:

This indicates that all effort recorded on all timesheets for all employees for the month of December, 2006 has directed 435.0 hours to the Widget Co. Project, that all employees have a total estimate to complete of 774.0 hours for their remaining work, and that the administrative user has indicated that the baseline estimate for all work (that is, the Est. Hours values entered for the project) is a total of 2,234.5 hours.
The "Hours Difference" column indicates the difference of hours between the baseline hours provided by the administrator and the total of all time recorded to date and the estimate which employees believe will be required to complete their work. This variance indicates whether there is a surplus or deficit in the manager's estimated hours and may point to areas of concern (which can be seen in further detail through the Project Estimates report described later in this section).
For example, in the report shown above, the difference in hours between the manager's estimates and the total of time recorded to date and the estimate to complete is 1025.5 hours. This indicates that the manager may have provided too generous an estimate for the work to be completed, or employees may not have allocated sufficient estimates in their hours to complete the work planned ahead.
In cases such as the "Administration" project shown above, no estimates have been provided by employees and no baseline has been provided by the project manager. As a result, the 'difference' between estimated and actual effort is already a negative value (-45.0 hours) as no time has been set aside in project estimates for these administrative tasks -- a possible scheduling hole for effort which may not have been considered in project planning.
A note of suggestion for your Estimate vs. Actual report calculations:
The "Estimate to Complete" provided by your staff through their individual estimate entries will indicate the number of effort hours which they believe will be required to complete their work. However, any timesheet hours entered after that date may temporarily distort the "Hours Difference" variance value displayed in a manager's reports (since the estimate to complete remains unchanged, even though the employee has now entered a few timesheet hours towards that work for the current week).
To ensure your managers receive a true picture of a project's current estimates vs. actuals (and allow them to confirm their total estimates do match the estimated and actual effort sums of their staff), it is recommended that the "Date To" value entered for the report filter's date range only include the days up-to-and-including the last date on which staff were to have provided updated estimates (for example, the previous week's week ending day). This ensures that a manager's est. vs. actuals reports will not include any time recorded after the latest "estimates to complete" provided by their staff.
To ensure estimates remain consistent between all team members, it is also recommended that estimates be considered from a single baseline day (for example, instructing your team to provide values for their individual work "estimates to complete" for your office's current week ending day onwards).
Your Project Estimates report provides a detail level of information for the Project Estimate Summary report described above. As with the summary report, this information is displayed in columns for the total of employee effort provided to date, the total of all estimates to complete that work, the baseline hours provided by the manager and the hours difference between the estimate provided by a manager and the estimates and actuals recorded by employees.
As shown in the earlier Project Estimate Summary, the hours difference between estimates and actuals is 1,025.5, but now we can see specifically which activities and tasks may require refinement in their estimates:

As shown, the manager has estimated significantly more effort for GUI Development than staff have allocated in their estimates (a discrepancy of 193.5 hours between the manager's estimate and employee estimates and actuals), and Quality Assurance is also showing a shortfall (of 102.5 hours). On the opposite end of the estimate spectrum, the employee estimate to complete for Database Development is significantly higher than the manager's own, indicating that there may be more of a technical challenge in that work than originally thought.
We can also see that the Design component of the project has not yet had any time allocated for estimates at all, although work is being recorded to that activity. Perhaps that work is being performed ad-hoc rather than as part of a formal project plan?
Further detail can be seen in this report by selecting the "Display Employee Info" option in the Report Settings and creating the report again:

Now we can see the specific hour total and estimate values provided by all employees in the project along with the activity and task-level summaries. This will allow the manager to identify directly which estimated and actual hours may be conflicting with the high-level managerial estimates entered in the project administration screens (as the Est. Hours for that planned work).
Your Project Estimates by Employee report displays a summary of all time recorded to date by an employee, along with their "estimates to complete". This provides a summarized view of the Project Estimates Report described above, and lists out for each individual employee where their effort is being directed and where they plan to direct effort in the future.
For example, looking at the estimates and actuals for Tycho Brahe for the month of December, 2006, we see the following:

A bit of un-planned administrative work (5.5 hours) appears to have been recorded for the month, with the bulk of Tycho's future work allocated to the Data Conversion task of the Database Development activity. It also appears as though all Design work has been completed for Tycho's planned work, since no further effort is estimated for that Activity.
Considering the Project Estimates report again (as described above), the lack of time recorded to the Quality Assurance task may point to a bit of trouble in the future. With a managerial baseline estimate of 270 hours for that work, is the 5.0 hours booked to date by Tycho (with no estimates listed for the future) sufficient for that activity?
Your Employee Estimate Listing report displays the actual estimated hours and associated comments entered by employees and provides you with an overview of where future effort will be directed. For example, considering an Estimate Listing created for Tycho Brahe:

We can see specifically why the effort for the "Data Conversion" task has been set higher than the manager's original estimate for the work, with Tycho's comments indicating that the estimate may grow higher still once initial analysis work has been completed for the project.
Similar to the Billable vs. Non-Billable Hours report, the equivalent Amounts report shows side-by-side the amounts which would be calculated from recorded hours using your system's settings for project billing rates. The resulting totals will be the same as for a pair of billable and non-billable invoice reports which used the same report filter.
Using the values from the "Non-Billable Invoice" example used later in this section, a Billable vs. Non-Billable Amounts report created from that data would display the following:

As in the non-billable invoice example shown below, the total amounts for both billable and non-billable work are displayed, with the total of both amounts shown in the rightmost column.
As with the Project Effort Summary report described earlier in this section, your Project Billing Summary displays all data contained in the Project Billing report, but only at a Project level of detail. This allows a manager to obtain a quick snapshot of the amounts billed to various projects during the time period of interest.

Your Project Billing report provides output in the same format as used by your Project Effort report, but lists the amounts charged for the recorded time instead of the hours recorded by each employee. This provides a breakdown by employee of revenue generated for project effort.

These billing values correspond to the sums calculated in a project Invoice, with the logic for the calculation of those amounts explained under Invoice Report shown later in this section. This report can be set to display only the revenue generated for a particular project over a period of time (as shown) or can display all revenue generated for all projects.
Your Employee Billing report lists out the revenue which each individual employee has generated for their recorded effort hours. The report is displayed in the same format as that used for your Employee Effort report, with the billing amounts displayed in place of the recorded time:

These billing amounts correspond to the sums calculated in a project Invoice, with the logic for the calculation of those amounts explained Invoice Report listing shown later in this section. The report can be created to display only the revenue generated for a particular project over a period of time (as shown) or can display all revenue generated for all projects.
Your Work and Billing report provides a consolidated listing of effort and amounts billed to date, with estimated time, actual effort hours and amount billed to date displayed for the chosen projects, activities and tasks. This report combines the details provided in the Work in Progress report with your billing report data.

Your Invoice report calculates billing amounts based upon entered timesheet hours, the billing rates specified for your projects, specific billing rates assigned to billing codes and the rates noted as defaults for individual employees, with taxes applied as defined within your system's tax administration screen. A typical completed invoice would appear as follows:

This example invoice has been created for all employees which have recorded time against the Widget Co. Project for the Week Ending Friday, July 29th, 2011, with the associated timesheet information for those employees being:

The specific billing rates of the employees have been applied against the timesheet hours displayed within the Invoice report's body:

For this example, billing rates have been defined within the project and the billing rate administration screens as follows (for clarity, rates are considered to be in dollars per hour. These amounts can similarly be applied as euros, pounds, etc. as appropriate for your company):
- The Project has a default billing rate of $50.00 per hour;
- Tycho Brahe will be billed at a rate of $75.00 per hour for any Management tasks and will use the project's default rate for all other work;
- Ada Byron will be billed at a rate of $100.00 per hour, unless she is performing documentation review as part of quality assurance, in which case her billing rate will be $50.00 per hour;
- Geoff MacKay will be billed at a rate of $25.00 per hour for all work on all Projects, with his default User rate set to that amount;
- Johannes Kepler will be billed at the project's default rate for all work.
Within the invoice body, the individual line-item entries are ordered by the listed users' last names, with the billing rates displayed for each user in the order shown on the billing rate administration screen. After all user-specific billing rates have been listed on the invoice, the last billing line for the user will display any remaining hours which are charged against the Project's default rate.
For the example shown, Tycho Brahe worked a total of 37.5 hours for the week ending July 29th, 2011. Of that time, 5.0 hours were spent on non-billable administrative tasks, 5.0 hours were spent on management tasks and the remaining 27.5 hours were spent on other Widget Co. Project analysis and design efforts.
Since management work is billed for Mr. Brahe at a specific rate, that line item appears first for him on the invoice, with the 5.0 hours charged out at $75.00 per hour. The following line lists the remaining 27.5 hours billable at the project's default rate of $50.00 per hour.
As shown, the Invoice report will only include those hours specifically recorded to the identified project. All other hours will be disregarded and will not be listed on that project's invoice.
An invoice is created for a selected project. If you have selected an activity or task billing code for your report, your report will still be created for the full project selected.
If a specific employee's billing rate is set to 0 or if both the default billing rate for the user record and project are left blank, any time recorded against that rate will still be shown on the invoice, with a total resulting charge displayed as 0.00.
The taxes which are applied to the invoice are defined in your system's tax administration screen and applied to your project through your project administration screen. For the taxes applied to the example invoice:
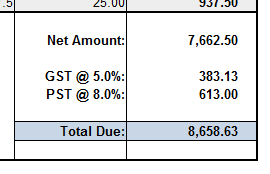
System taxes one and two have been defined as 'GST' and 'PST', with their rates set to 5.0% and 8.0% respectively. As their corresponding "Taxes" checkboxes have been set On in the project's record, these taxes have been applied to the final invoiced amount. All amounts calculated on the invoice are rounded up to the nearest penny. For example, a tax amount calculated as $127.654 would be truncated to $127.65 and an amount calculated as $127.655 would be rounded-up to display as $127.66.
The mailing addresses displayed for the company and project are set with the mailing address button found in your application settings and project administration screens. If more than five lines of text have been provided for your office or project mailing address, the sixth and subsequent lines of text will be appended to the fifth line displayed for the mailing address. Where the text reads "Your Company Name Inc.", the company name for which your Senomix account is registered will be displayed in this area.
When an invoice is created, the Invoice No. will be left blank and can be manually edited to suit your office's invoice numbering standard. In web page reports, this area is left as an editable text field (click your cursor in the area on your web browser screen after the text label "Invoice No.:" to enter text before typing). In Microsoft Excel, all text on the invoice can be changed once you have created your report, with space provided to include information specific to your office, such as corporate logo images, billing dates, invoice payment terms and conditions, warranties, etc. as you would like.
Non-Billable Invoices
When creating an invoice, options are available to include "Only Billable Items" or "Only Non-Billable Items". In the example above, the invoice was set to include billable items. If you would like to create an invoice to itemize work recorded to a project as being non-billable, select the "Only Non-Billable Items" option before creating your invoice. The resulting invoice would then display the non-billable sums based upon your entered billing rates.
Considering the example data above, if it was decided that all Analysis work would be recorded as non-billable:

An invoice created for non-billable work on the Widget Co. Project for that week would result in the following:

With the invoice itemizing the amounts which would have been billed if those hours were recorded as being billable. To indicate that the invoice is an itemization of non-billable work, a text note "Non-Billable Work Only" is appended to the project name in the report.
Your Expense Claim Listing report allows you to view expense claims as they have been entered by your staff. Each expense claim item which matches the specified report filter is listed, with a total amount shown both for each expense claim and for the report itself, with a 'grand total' including all listed expense claim amounts.
Please note: Unlike other reports, the Expense Claim Listing report (along with all Expense Claim "Data Export" reports) uses the Claim Date attribute of the records to determine which expense claims to include in the report output. The date of the individual expense claim items is not considered for this report. So, all expense claim items will be output for a given expense claim date, regardless of the individual item dates.
For example, a listing of Expense Claims entered by Tycho Brahe for the month of January might appear as follows:

As with timesheet reports, an expense claim listing report can be filtered to only display those projects, activities and tasks of interest, or to restrict output to billable or non-billable items. For example, if the expense claim list shown above was re-created with a filter to only display billable items, the report output would be adjusted to remove the single $400 item for Meals per-diem shown above:

Your Expense Claim Item Listing report displays individual expense claim items entered in Senomix, allowing those items to be viewed outside the context of their parent expense claim records.
As with Timesheet reports (and unlike the Expense Claim Listing report described above), it is the date of the individual expense claim items which is used by this report's filter to determine whether or not an entry is to be included in the report output.
For example, an Expense Claim Item Listing report created for Tycho Brahe for the dates January 22nd, 2012 through to January 25th, 2012 would produce the following output:

Using the Expense Claim Listing report shown in the previous example for reference, we can see that only the expense claim items which fall within the provided date range are included in this report, with all other claim items excluded.
Your Item Listing by Expense Type report includes the same item elements as output in the Expense Claim Item Listing report, but with each set of items grouped by the indicated expense type. A total for each group of items is provided under each expense type, with a grand total for the report summed at the end.
For example, an Item Listing by Expense Type created for Tycho Brahe for the month of January might appear as follows:
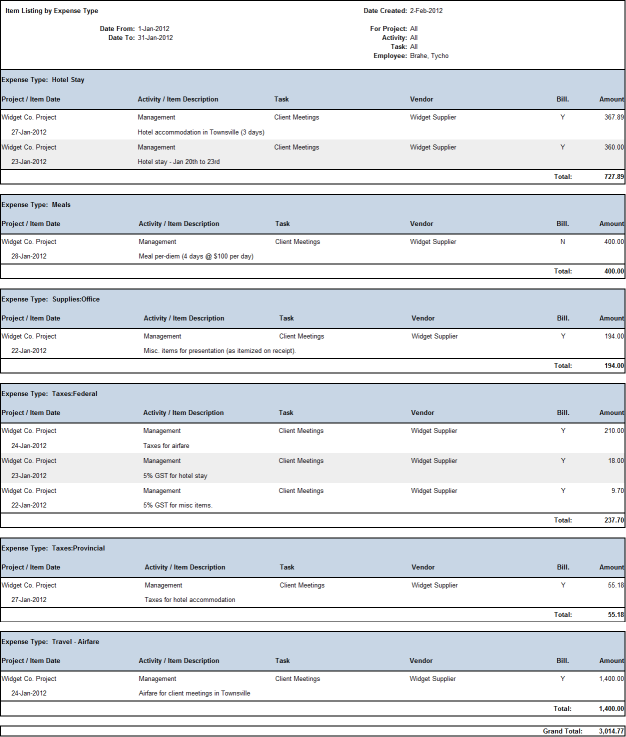
As shown, the individual items are broken out into groups for their respective Expense Types. This would allow you to identify a breakdown of items for a given time period such as "supplies purchased for Project X", or "all Federal Tax billed to expenses for this year".
As with your listing by Expense Type, the Item Listing by Vendor report includes the same item elements as output in the Expense Claim Item Listing report, but with each set of items grouped by the indicated vendor. A total for each group of items is provided under each vendor group, with a grand total for the report summed at the end.
Similar to the previous example, an Item Listing by Vendor report created for Tycho Brahe for the month of January might appear as follows:

In this example, all items correspond with the single Vendor 'Widget Supplier', for which the off-site meeting was held.
Your Database Export reports provide a CSV or fixed-format flat file of timesheet and expense claim data which can be used as an import file for an external database. These reports and their specific character-by-character format is described in detail in the Appendices of this document.
Please Note: The Database Export reports for Expense Claims use the Claim Date attribute of the records to determine which expense claims to include in the report output. The date of the individual expense claim items is not considered for expense claim database export reports. So, all expense claim items will be output for a given expense claim date, regardless of the individual item dates.
When created, your export reports will be automatically saved to your computer's Downloads folder.
Your Billing Codes report provides you with a reference spreadsheet of all project, activity and task billing codes in your system. The report itself displays the code, name and active / inactive state of all project, activity and task billing codes and can be used as a quick reference to assist your system management.
The report is created in your computer's Downloads directory with the filename senomix_billing_codes.xls and can be opened in Microsoft Excel.
Your chart review screen displays the charts created for your system reports and is shown whenever chart output has been requested.

The buttons and fields provided on this screen are as follows:
Home
Exits the screen and returns you to your main menu.
Back
Exits the screen and returns you to your create report screen.
Help
Opens a new web page displaying help for your current screen.
Chart Filter Overview
An information area displayed at the top of your charts outlining the type of charts shown along with the filter criteria used to obtain the data.
This will show the date range of your displayed chart data, along with any other filtering for projects, user groups, project groups, etc. which you have specified.
Each chart corresponds with a system report, allowing you to visualize in a pie or stacked area chart the numeric data created from your project time, billing and expenses. If you would like to view your reports and charts at the same time, you can create a report in a new window, and then create the appropriate charts for a visual overview of your data.
Each set of charts relates to your system reports as follows:
| Senomix Report | Matching Chart |
|---|---|
| Work in Progress | Work Overview |
| Work and Billing | Billing Overview |
| Billable vs. Non-Billable Hours | Billable vs. Non-Billable Hours |
| Billable vs. Non-Billable Amounts | Billable vs. Non-Billable Amounts |
| Project Effort | Project Effort Overview |
| Project Effort Summary | Project Effort Overview (All Projects chart) |
| Project Billing | Project Billing Overview |
| Project Billing Summary | Project Billing Overview (All Projects chart) |
| Employee Effort | Employee Effort Overview |
| Employee Billing | Employee Billing Overview |
| Expense Claim Item Listing (positive and non-zero items only) |
Expense Claim Overview |
For example, if you created a Work in Progress report for a particular range of dates, project groups and employees, a Work Overview chart created with the same report filter would give you a pie chart visualization of that exact report data.
Each set of chart output will display a 'grand total' chart showing values for all projects or employees referenced in the chart output, followed by detail charts which show the projects, employees, etc. which relate to the chart grand total.
You can print the web page containing your chart review screen to obtain a paper copy of all charts as they are shown, or you can choose to print or save individual charts from your screen by using the widget provided when using the Enable Chart Save option on your create report screen. Once a chart has been saved, you can include it in any external reports or presentations you may care to prepare.
Please Note: The expense claim overview chart only includes expense claim information which has a positive or non-zero value. So, negative-value entries provided to note received expense claim reimbursements, or zero-value entries noted to provide a record of zero-cost items will not be included in your expense chart output.
Each of your pie and area charts provide interactive options to refine your data display. You can interact with each by clicking your charts, labels, and legend items.
Detail pie charts provide options for data drilldown, allowing you to view the items which make up the quantities and amounts shown for a particular pie chart slice.
For example, clicking the Quality Assurance activity in the corresponding slice of this pie chart:
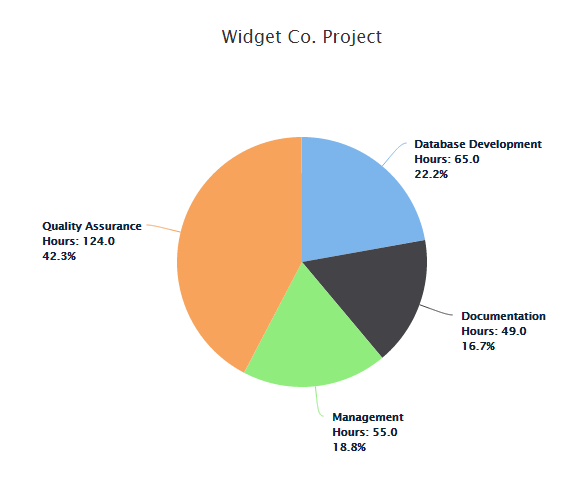
Will show the associated tasks which make up that selected activity:
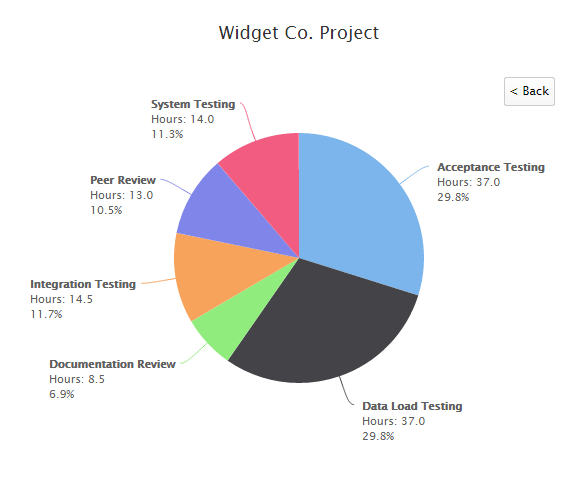
You can then return to the project-level chart by clicking the "< Back" button provided in the chart's upper-right corner.
You can choose to hide or show items included in your area chart display by clicking the corresponding legend label for that item. For example, within this area chart for All Projects covering the time period of August 1st through to September 30th, 2014:

Clicking the legend item for "Widget Co. Project" will set the text colour to grey and remove those hours from the chart's output:

Allowing you to see how the other chart elements interact without those hours present.
If a particular region of an area chart is of interest to you, you can click and drag your mouse pointer to select that region:

Which will present your selected area in a zoomed chart:

To return to the full-sized chart, click the "Reset Zoom" button displayed in the top-right corner of your zoomed chart.
Your review records screen lets you retrieve a set of employee timesheets or expense claims from your system's database for review.
Records can be retrieved for a specific date range, a single employee, or a group of employees. Records can also be retrieved by billing code (returning only those records which include the project, activity, and task you have selected), or by their state of approval (allowing you to return only records which have not yet been approved).
This screen is reached from your main menu.

The buttons and fields provided on this screen are as follows:
Home / Back
Exits the screen and returns you to your main menu.
Clear
Clears all filter elements on the screen. A cleared screen will return all timesheet or expense claim records in your system.
Get Records
Returns all timesheet or expense claim records which match your request. Your timesheet or expense claim administration screen will be opened to display your records.
Help
Opens a new web page displaying help for your current screen.
Date From
The lower bound date of the timesheets or expense claims to include in your request.
If this value is provided for your record request, all timesheets or expense claims which fall on or after this date will be included in your returned list of records.
In the example shown above, all timesheets which included a day on or after February 1st, 2014 would be returned for review.
Date To
The upper bound date of the timesheets or expense claims to include in your request.
If this value is provided for your record request, all timesheets or expense claims which fall on or before this date will be included in your returned list of records.
In the example shown above, all timesheets which included a day on or before February 28th, 2014 would be returned for review.
This Week
A button which will populate your Date From and Date To fields for the time period of your office's current timesheet week.
Last Week
A button which will populate your Date From and Date To fields for the time period of your office's previous timesheet week.
This Month
A button which will populate your Date From and Date To fields for the first and last day of the current month.
Last Month
A button which will populate your Date From and Date To fields for the first and last day of the previous month.
Employee
A selector which allows you to indicate that only timesheets or expense claims for a single employee are to be reviewed. If left blank, timesheets or expense claims which belong to any employee will be included in your record list.
In the example shown above, only timesheets which belong to the employee "Marie Curie" will be returned for review.
User Group
A selector which allows you to indicate that only timesheets or expense claims belonging to a particular group of system users are to be reviewed.
You can define your user groups, and the employees which are and are not included in those groups, through your user group administration screen.
Billing Code
A set of project, activity and task selectors used to indicate that only timesheets or expense claims which include a particular billing code are to be reviewed. If a billing code is specified in these fields, only those records which include at least one entry related to that project, activity, and task will be returned for review.
In the example shown above, only timesheets which include hours recorded for the "Widget Co. Project" will be returned for review.
Only include non-approved records
A checkbox which indicates whether the reviewed records should contain all timesheets or expense claims, or only those which are not approved. If set 'On', only those timesheets or expense claims which have not yet been approved will be returned for review.
Timesheets / Expense Claims
A set of radio buttons which indicate whether your request is for timesheet or expense claim records.
Your timesheet administration screen lets you review the contents of entered timesheet records, edit and save changes to timesheets which are not noted as being approved, and approve or disapprove timesheets as appropriate.
Timesheets can also be deleted using this screen if the timesheet and expense claim deletion option has been enabled for your Senomix session (as described in Section 3.31).
This screen is reached from your review records screen after sending a request to "Get Records".

The buttons and fields provided on this screen are as follows:
Home
Exits the screen and returns you to your main menu.
Back
Exits the screen and returns you to your review records screen.
Approve / Disapprove
Approves or disapproves the selected timesheet as appropriate for its current approval status. Once record has been approved, it will be locked from any further edits, with your account noted as being the 'approval user' for the timesheet.
Disapproving an approved timesheet will unlock the record and allow changes to be made to its contents both through your administration application and through an employee's time entry application.
Approve All
Approves all listed timesheets that have been marked as complete and ready for approval.
Details
Opens the selected timesheet in your timesheet detail screen. If the timesheet is not approved, the record can also be edited and its changes saved through that screen.
Delete
Deletes the selected timesheet and all of its associated hour and comment entries. Once a timesheet has been deleted, it will be permanently removed from your system.
Before being able to delete a timesheet, you must first enable timesheet and expense claim deletion through your system settings screen. Once deletion has been enabled for your session, you will be able to remove any timesheet or expense claim from your system.
Since deleting a timesheet is something typically done only on rare occasions, this extra step for first enabling your delete button is a safety measure put in place to help avoid accidental record removal.
Prev
Selects the previous timesheet displayed in the screen's table window.
Next
Selects the next timesheet displayed in the screen's table window.
Help
Opens a new web page displaying help for your current screen.
Employee Name
Displays the name of the employee to whom the selected timesheet belongs.
Employee No.
Displays the employee number of the employee to whom the selected timesheet belongs.
Week Ending Date
Displays the week ending date of the selected timesheet.
Submitted Date
Displays the submitted date of the selected timesheet. This is the date/time on which the timesheet was marked as complete by an employee.
Timesheet Id
Displays the system-assigned id of the selected timesheet.
Approval Status
Displays the approval status of the selected timesheet. This will be one of Incomplete (for timesheets which are still being edited by employees and have not yet been submitted for approval), Awaiting Approval (for timesheets which have been marked as complete for the week by an employee and submitted for approval), Approved (for approved timesheets) , or Disapproved (for timesheets which have been disapproved).
Approval User
Displays the name of the system user who approved or disapproved the selected timesheet.
If the selected timesheet is still pending approval, this field will be blank.
Approval Date
Displays the date and time on which the selected timesheet was approved or disapproved.
If the selected timesheet is still pending approval, this field will be blank.
To approve or disapprove a timesheet, select the record in your table window and click the approve (or disapprove) toolbar button. After clicking "Yes" in the confirmation prompt which appears for your action, the selected timesheet will be approved and locked from further edits (or disapproved and be made open for edits once again).
Your timesheet detail screen allows you to review the contents of an employee timesheet and create a printable copy of the record and its comments.
If the timesheet has not been noted as being approved or marked as complete for the week, the "Edit Timesheet" button will be enabled, allowing you to change the record's contents. If the record is approved and locked from further edits, the button will instead be disabled and noted as being "Locked". If marked as complete by the timesheet's owner but not yet approved, the edit button will be disabled and read "Submitted".
This screen is reached from your timesheet administration screen after selecting a timesheet record and clicking the "Details" toolbar button to review its contents.

The buttons and fields provided on this screen are the same as those available in the timesheet detail screen of your time entry application.
If your office or client site requires a physical, signed copy of a time sheet, a printable record can be created at any time by clicking the "Get Printable" toolbar button on your timesheet detail screen.
After your report has been created, you can print, email or save it as you would like. Since the printable timesheet is a report which may be provided to clients at remote work sites, the timesheet does not include any time tracking comments in the printed output. If you would like to review your timesheet comments in a printable document, you can do so by clicking the "Get Comments" toolbar button.
Once the "Get Printable" button has been clicked, a formatted report will be created and automatically opened in a new web page or in Microsoft Excel as fits your report settings. You can change your preference for how reports are created in your application through your Settings screen.
A web page version of your printable timesheet would be created in a new popup window which appears on top of your Senomix session:

When creating your report as a web page, your web browser may prompt you with a popup warning when clicking your "Get Printable" report button. If that popup warning appears for you, you can select that all popups from "www.senomix.com" should be allowed (which will prevent that warning from appearing when creating reports).
Please Note: Mac users working with the Safari web browser must change their web browser preferences to allow popup windows. That can be done on your Mac in the Safari Preferences -> Security -> Allow Popup Windows setting.
If your report preferences are set to create your reports in Microsoft Excel, Excel will be automatically opened for you when creating your report. A Microsoft Excel confirmation message will also appear:

That confirmation message must be acknowledged before your computer will allow the opening of Excel for your report. After confirming the message by clicking "Yes", your printable timesheet will be opened as a formatted Microsoft Excel document:

Your timesheet entry screen allows you to edit the contents of an employee timesheet.
This screen is reached from your timesheet detail screen after clicking the "Edit Timesheet" button (which is only available for records which are not approved).

The buttons and fields provided on this screen are the same as those available in the timesheet entry screen of your time entry application, with the exception of the "Set as Default" button, which is not available for use in your administration application.
Your expense claim administration screen lets you review the contents of entered claims, edit and save changes to claims which are not noted as being approved, and approve or disapprove expense claims as appropriate.
Expense claims can also be deleted using this screen if the timesheet and expense claim deletion option has been enabled for your Senomix session (as described in Section 3.31).
This screen is reached from your review records screen after sending a request to "Get Records".

The buttons and fields provided on this screen are as follows:
Home
Exits the screen and returns you to your main menu.
Back
Exits the screen and returns you to your review records screen.
Approve / Disapprove
Approves or disapproves the selected expense claim as appropriate for its current approval status. Once record has been approved, it will be locked from any further edits, with your account noted as being the 'approval user' for the expense claim.
Disapproving an approved expense claim will unlock the record and allow changes to be made to its contents both through your administration application and through an employee's time and expense entry application.
Details
Opens the selected expense claim in your expense claim detail screen. If the expense claim is not approved, the record can also be edited and its changes saved through that screen.
Delete
Deletes the selected expense claim and all of its associated entries. Once an expense claim has been deleted, it will be permanently removed from your system.
Before being able to delete an expense claim, you must first enable timesheet and expense claim deletion through your system settings screen. Once deletion has been enabled for your session, you will be able to remove any timesheet or expense claim from your system.
Since deleting an expense claim is something typically done only on rare occasions, this extra step for first enabling your delete button is a safety measure put in place to help avoid accidental record removal.
Prev
Selects the previous expense claim displayed in the screen's table window.
Next
Selects the next expense claim displayed in the screen's table window.
Help
Opens a new web page displaying help for your current screen.
Employee Name
Displays the name of the employee to whom the selected expense claim belongs.
Employee No.
Displays the employee number of the employee to whom the selected expense claim belongs.
Claim Date
Displays the claim date of the selected expense claim.
Expense Claim Id
Displays the system-assigned id of the selected expense claim.
Approval Status
Displays the approval status of the selected expense claim. This will be one of "Approved" (for approved expense claims), "Disapproved" (for expense claims which have been disapproved), and "Pending Approval" (for expense claims which have not yet been approved).
If the expense claim has been noted as having been paid to the employee who submitted the claim (using the 'Paid' toggle on the expense claim record), the text '- Paid' will be appended to the approval status of the claim.
Approval User
Displays the name of the system user who approved or disapproved the selected expense claim.
If the selected expense claim is still pending approval, this field will be blank.
Approval Date
Displays the date and time on which the selected expense claim was approved or disapproved.
If the selected expense claim is still pending approval, this field will be blank.
To approve or disapprove an expense claim, select the record in your table window and click the approve (or disapprove) toolbar button. After clicking "Yes" in the confirmation prompt which appears for your action, the selected expense claim will be approved and locked from further edits (or disapproved and be made open for edits once again).
Your expense claim detail screen allows you to review the contents of an employee expense claim and create a printable copy of the record for signature.
If the expense claim has not been noted as being approved, the "Edit Claim" button will be enabled, allowing you to change the record's contents. If the record is approved and locked from further edits, the button will instead be disabled and noted as being "Locked".
The "Paid" checkbox may be used to indicate whether or not an expense claim has been paid to an employee for reimbursement. That checkbox may be changed (in the admin application only) when the expense claim is set to an editable state.
This screen is reached from your expense claim administration screen after selecting an expense claim record and clicking the "Details" toolbar button to review its contents.

The buttons and fields provided on this screen are the same as those available in the expense claim detail screen of your time and expense entry application.
If you require a physical, signed copy of an expense claim, a printable record can be created at any time by clicking the "Get Printable" toolbar button on your expense claim detail screen.
After your report has been created, you can print, email or save it as you would like.
Once the "Get Printable" button has been clicked, a formatted report will be created and automatically opened in a new web page or in Microsoft Excel as fits your report settings. You can change your preference for how reports are created in your application through your Settings screen.
A web page version of your printable expense claim would be created in a new popup window which appears on top of your Senomix session:

When creating your report as a web page, your web browser may prompt you with a popup warning when clicking your "Get Printable" report button. If that popup warning appears for you, you can select that all popups from "www.senomix.com" should be allowed (which will prevent that warning from appearing when creating reports).
Please Note: Mac users working with the Safari web browser must change their web browser preferences to allow popup windows. That can be done on your Mac in the Safari Preferences -> Security -> Allow Popup Windows setting.
If your report preferences are set to create your reports in Microsoft Excel, Excel will be automatically opened for you when creating your report. A Microsoft Excel confirmation message will also appear:
That confirmation message must be acknowledged before your computer will allow the opening of Excel for your report. After confirming the message by clicking "Yes", your printable expense claim will be opened as a formatted Microsoft Excel document:

Your expense claim entry screen allows you to edit the contents of an employee's expense claim.
This screen is reached from your expense claim detail screen after clicking the "Edit Claim" button (which is only available for records which are not approved).

The buttons and fields provided on this screen are the same as those available in the expense claim entry screen of your time and expense entry application.
Your configuration sub-menu screen provides access to project and user group configuration, and (through the "Other Items" button), access to vendor, expense type, and tax configuration, along with the ability to copy a project's configuration or to reassign billing codes from one project, activity or task to another.

The available options which can be reached from this screen are:
Home
Exits the screen and returns you to your main menu.
Back
Exits the screen and returns you to your main menu.
Help
Opens a new web page displaying help for your current screen.
Project Groups
Opens your Project Group Administration screen, allowing you to define groups of projects for filtering your reports.
User Groups
Opens your User Group Administration screen, allowing you to define groups of employees for filtering your reports.
Other Items
Opens your Other Items menu screen, which provides access to administration screens for vendor, expense type and tax definition, along with the ability to copy a project's structure or re-assign timesheet billing codes.
Your project group administration screen provides you with the ability to collect system projects together into easily queried groups for purposes of segmenting report data. For example, projects related to the client "Widget Co. Inc." could be consolidated under a "Projects for Widgets Inc." group, projects related to new application development could be added under a "System development projects" group, or projects which have not yet been completed could be added to a "Projects to be completed" group.
With a project group defined, time and expense reports can be created which deliver data related only to the individual projects assigned to that group. Projects can be assigned to a project group by selecting the group of interest and clicking the Projects button.
This screen is reached from your configuration sub-menu.

The buttons and fields provided on this screen are as follows:
Home
Exits the screen and returns you to your main menu.
Back
Exits the screen and returns you to your configuration sub-menu.
New
Clears the screen to prepare it for entering a new project group.
Save
Saves to your database any changes made to the displayed project group.
Delete
Deletes the displayed project group from your database.
Prev
Selects the previous project group displayed in the screen's table window.
Next
Selects the next project group displayed in the screen's table window.
Help
Opens a new web page displaying help for your current screen.
Project Group Name
The name given to the selected project group record.
Projects
A button which opens your project group entries screen, allowing you to assign projects to the selected project group.
Project Group Id
Displays the system-assigned id of the selected project group.
Your project group entries screen allows you to assign projects to one of your defined project groups. Once a project has been added to a project group, any time or expenses recorded to that project will be included in any report which references the group.
A project can be assigned to as many project groups as you would like. For example, the same project could be added to the "Projects to be completed" and "System development projects" groups and would appear on a report filtered for either of those groups.
This screen is reached from your project group administration screen.

The buttons and fields provided on this screen are as follows:
Home
Exits the screen and returns you to your main menu.
Back
Exits the screen and returns you to your project group administration screen.
Reset
Resets the displayed table windows for projects 'not in' and 'in' the selected project group to the last point at which the project group's entries were saved.
Save
Saves the project group entries to include all projects listed in the "Projects in Project Group" table.
Help
Opens a new web page displaying help for your current screen.
Group Name
The name of the project group for which entries are being set.
Projects Not in Project Group
Lists all projects which are not included in the project group.
Projects in Project Group
Lists all projects which are included in the project group.
Add
Adds the project selected in the "Projects Not in Project Group" table to the "Projects in Project Group" table.
Add All
Adds all projects listed in the "Projects Not in Project Group" table to the "Projects in Project Group" table.
Remove
Removes from the project group the project selected in the "Projects in Project Group" table.
Remove All
Removes all projects from the project group.
Your user group administration screen provides you with the ability to collect system users together into easily queried groups (such as "Administrative Staff" or "Marketing Staff") for purposes of segmenting report data.
With a user group defined, time and expense reports can be created which deliver data related only to the individual employees assigned to that user group. Employees can be assigned to a user group by selecting the user group of interest and clicking the Users button.
This screen is reached from your configuration sub-menu.

The buttons and fields provided on this screen are as follows:
Home
Exits the screen and returns you to your main menu.
Back
Exits the screen and returns you to your configuration sub-menu.
New
Clears the screen to prepare it for entering a new user group.
Save
Saves to your database any changes made to the displayed user group.
Delete
Deletes the displayed user group from your database.
Prev
Selects the previous user group displayed in the screen's table window.
Next
Selects the next user group displayed in the screen's table window.
Help
Opens a new web page displaying help for your current screen.
User Group Name
The name given to the selected user group record.
Users
A button which opens your user group entries screen, allowing you to assign employees to the selected user group.
User Group Id
Displays the system-assigned id of the selected user group.
Your user group entries screen allows you to assign user accounts to one of your defined user groups (such as "Administrative Staff" or "Marketing Staff"). Once an employee's user account has been added to a user group, their timesheet and expense claim records will be included in any query or report which references that group.
An employee can be assigned to as many user groups as you would like. For example, the same user account could be added to the "Quality Assurance" and "Administrative Staff" teams and would appear on a report filtered for either of those user groups.
This screen is reached from your user group administration screen.

The buttons and fields provided on this screen are as follows:
Home
Exits the screen and returns you to your main menu.
Back
Exits the screen and returns you to your user group administration screen.
Reset
Resets the displayed table windows for users 'not in' and 'in' the selected user group to the last point at which the user group's entries were saved.
Save
Saves the user group entries to include all employees listed in the "Employees in User Group" table.
Help
Opens a new web page displaying help for your current screen.
Group Name
The name of the user group for which entries are being set.
Employees Not in User Group
Lists all user accounts which are not included in the user group.
Employees in User Group
Lists all user accounts which are included in the user group.
Add
Adds the user record selected in the "Employees Not in User Group" table to the "Employees in User Group" table.
Add All
Adds all users records listed in the "Employees Not in User Group" table to the "Employees in User Group" table.
Remove
Removes from the user group the user record selected in the "Employees in User Group" table.
Remove All
Removes all user records from the user group.
Your other items sub-menu screen provides access to vendor, expense type, and tax configuration, along with the ability to copy a project's configuration or to reassign billing codes from one project, activity or task to another.

The available options which can be reached from this screen are:
Home
Exits the screen and returns you to your main menu.
Back
Exits the screen and returns you to your configuration sub-menu.
Help
Opens a new web page displaying help for your current screen.
Taxes
Opens your Tax Administration screen, allowing you to define taxes to be applied when calculating invoices from timesheet data.
Expense Types
Opens your Expense Type Administration screen, allowing you to define expense types for use in system expense claims.
Vendors
Opens your Vendor Administration screen, allowing you to define vendors for use in system expense claims.
Copy Project
Opens your Project Copy screen, allowing to copy the activities and tasks listed in one project or project template to another.
Reassign Codes
Opens your Timesheet Billing Code Reassignment screen, allowing you to move all timesheet entries and comments assigned from one billing code to another.
Your tax administration screen allows you to define the name and percentage rate of up to four individual service, regional or federal taxes. The names set for your taxes will be available for selection with checkboxes on your project administration screen, with percentages calculated on any invoices you may create for time recorded to those projects.
Taxes can be set to have a precision of up to three decimal places (for example, 4.255%).
This screen is reached from your other items menu:

The buttons and fields provided on this screen as follows:
Home
Exits the screen and returns you to your main menu.
Back
Exits the screen and returns you to your other items menu.
Reset
Resets the displayed taxes to the values last saved for your system.
Save
Saves any changes you have made to your tax names and rates.
Help
Opens a new web page displaying help for your current screen.
Name
Lists the names of the four federal, regional or service taxes you have defined.
Rate
Lists the percentage rate of the four federal, regional or service taxes you have defined.
Your expense type administration screen allows you to create and edit expense type records for use in categorizing expense claim line items.
This screen is reached from your other items sub-menu.

The buttons and fields provided on this screen are as follows:
Home
Exits the screen and returns you to your main menu.
Back
Exits the screen and returns you to your other items sub-menu.
New
Clears the screen to prepare it for entering a new expense type.
Save
Saves to your database any changes made to the displayed expense type.
Delete
Deletes the displayed expense type from your database.
Prev
Selects the previous expense type displayed in the screen's table window.
Next
Selects the next expense type displayed in the screen's table window.
Help
Opens a new web page displaying help for your current screen.
Expense Type Name
The name given to the selected expense type record.
Active
A checkbox used to indicate whether the selected expense type is active and available for use in system expense claims.
Expense Type Id
Displays the system-assigned id of the selected expense type.
Your vendor administration screen allows you to create and edit vendor records for use in assigning expense claims to a particular supplier of goods or services.
This screen is reached from your other items sub-menu.

The buttons and fields provided on this screen are as follows:
Home
Exits the screen and returns you to your main menu.
Back
Exits the screen and returns you to your other items sub-menu.
New
Clears the screen to prepare it for entering a new vendor.
Save
Saves to your database any changes made to the displayed vendor.
Delete
Deletes the displayed vendor from your database.
Prev
Selects the previous vendor displayed in the screen's table window.
Next
Selects the next vendor displayed in the screen's table window.
Help
Opens a new web page displaying help for your current screen.
Vendor Name
The name given to the selected vendor record.
Active
A checkbox used to indicate whether the selected vendor is active and available for use in system expense claims.
Vendor Id
Displays the system-assigned id of the selected vendor.
Your project copy screen allows you to copy activities and tasks from one project or project template to another.
Instead of copying activities and tasks, it is almost always better to use a project template to share a central set of activities and tasks instead. Copying a project will increase the size of your system's data files by a small amount and, over the years, this may slow down the speed of your system login. In contrast, a project template allows you to reference the same set of activities and tasks across projects without increasing the size of your data files, or requiring you to manage multiple sets of the same activities and tasks.
This screen is reached from your other items sub-menu:

The buttons and fields provided on this screen as follows:
Home
Exits the screen and returns you to your main menu.
Back
Exits the screen and returns you to your other items menu.
Clear
Clears the 'from' and 'to' project selectors, allowing you to select a new project, activity and task for copying.
Copy Project
Starts the project copy process, under which all activities and tasks listed in the project noted in your 'from' selector will be copied to the project or project template noted in your 'to' selector.
Help
Opens a new web page displaying help for your current screen.
From Project
A project selector which allows you to specify the project or project template from which activities and tasks are to be copied.
To Project
A project selector which allows you to specify the project or project template to which activities and tasks are to be copied.
This screen has been provided to assist a manager in setting up a project or project template which is close in structure to an existing project, but which requires a new set of activities and tasks. For example, a bespoke project which requires the tracking of time at the activity and task level, or a new type of work which requires a project template slightly different than an existing template.
A project copy action will never overwrite the activities and tasks located in a 'to' project. If a 'to' project already contains an activity or task with an activity/task code identical to another activity or task in the 'from' project, that item will not be copied.
In the example shown in the screen shot above, a new template is being created for Development Work which will be based on the structure of the Widget Co. Project. After selecting that project and project template in the 'from' and 'to' selectors, the Copy Project button is clicked to start the copy process. Before proceeding, an information message is shown which reminds you that using a project template provides a better solution for sharing activities and tasks between projects:

After dismissing that message by clicking Ok, a confirmation message will appear which indicates the project or project template from and to which the project copy will be performed:

After clicking Yes, the project copy will be performed, with an information message displayed to you once that action has been completed:

As noted in that message, you will need to sign in to your system again to refresh your data before your copied project will be available for reference. After clicking Ok, you will be signed out of your Senomix session and can sign in again to retrieve your new project data.
Your timesheet billing code reassignment screen allows you to move all recorded timesheet hours and comments from one project, activity and task billing code to another.
This screen is reached from your other items sub-menu:

The buttons and fields provided on this screen as follows:
Home
Exits the screen and returns you to your main menu.
Back
Exits the screen and returns you to your other items menu.
Clear
Clears the 'from' and 'to' billing code selectors, allowing you to select a new project, activity and task for reassignment.
Reassign Codes
Starts the code reassignment process, under which all time and comments recorded to the project, activity and task you have noted in the 'from' selector will be transferred to the project, activity and task you have chosen in your 'to' selector.
Help
Opens a new web page displaying help for your current screen.
From Billing Code
A project, activity and task selector which allows you to specify the billing code from which recorded time and comments are to be reassigned.
To Billing Code
A project, activity and task selector which allows you to specify the billing code to which time and comments recorded under the 'from' billing code are to be reassigned.
The timesheet billing code reassignment screen would be used in cases where a manager's plans for recording time have changed mid-project, with your office now wishing to move or consolidate hours recorded from one billing code to another. For example, if it was decided that a task should be adjusted to become an activity of its own (allowing further detail for that item, with tasks created for the new activity), all hours and comments recorded to that task could be moved to the newly created activity.
In the example illustrated here, a manager has decided that the Data Conversion task in the Widget Co. Project's Database Development activity should become an activity of its own, with time now to be tracked at the task level to subdivide work performed on the various database tables.
To account for this, a new Data Conversion activity has been created under the Widget Co. Project, with all time assigned to that activity from the previous Database Development / Data Conversion task. This is accomplished by selecting those billing codes in the appropriate from/to project, activity and task selection boxes (as shown in the screen shot above) and then clicking the "Reassign Codes" button to start the reassignment process.
If hours are already recorded for the 'to' project, activity and task you have specified, time and comments will be merged on any days for which there is both a time entry for your 'from' and 'to' billing codes.
With the Reassign Codes button clicked, a confirmation message is displayed which describes the code reassignment to be performed:

Please note: As mentioned in your confirmation prompt, reassigning time and comments from one billing code to another is a one-way process. Once time and comments have been reassigned to a new billing code, that action cannot be reversed.
After clicking Yes on your prompt, the billing code reassignment process will begin. Since the length of time required for the code reassignment to complete may be anywhere from a few moments to a few minutes of time (depending upon the number of timesheets contained in your office's database), it is best to perform the code reassignment process at a time when you expect little or no activity in your system (for example, in the early evening, after regular office hours).
Once your billing code reassignment has been completed, a confirmation message will be displayed:

All recorded time and comments will now have been reassigned from the old project, activity and task you have specified to the new.
Any expense claims or time estimates entered under the old 'from' billing code will remain untouched. Reassignment for estimates and expense claims should be handled on a record-by-record basis as appropriate for your office.
Your application settings screen allows you to customize the display and functionality of your Senomix account, and to adjust your office's system-wide Senomix settings.
This screen is reached from your configuration sub-menu:

The buttons and fields provided on this screen as follows:
Home
Exits the screen and returns you to your main menu screen.
Back
Exits the screen and returns you to your configuration sub-menu.
Save
Saves your displayed settings.
Help
Opens a new web page displaying help for your current screen.
Create Reports Using
A radio button pair that allows you to set whether your reports will default to be created as a web page or as a Microsoft Excel spreadsheet file. By setting your preferred report output option here, you will not need to select that item when creating your reports.
Hours Rounding
Sets the behaviour of the Round Hours button shown on the timesheet screen of all applications used by your office.
Depending upon the selection of this item, your office's "Round Hours" button will always round timesheet hours up to the nearest five, six, ten, fifteen or thirty minutes, or will round hours up or down to the nearest of those increments.
If a rounding option is selected that ends with the text "(allow rounding down)", hours will be rounded to the nearest indicated increment of time (allowing the rounding down of entered effort hours). Otherwise, hours will always be rounded up to the nearest of the chosen time increments.
If the hours value entered in a field is less than the chosen time increment for rounding, those hours will always be rounded up -- hours will never be rounded down to 0.0. For example, if 0.01 hours were entered in a field and that entry was rounded to the nearest 15 minutes, the value would always be rounded to 0.25 hours. Similarly, if you have chosen to allow rounding down, an entered value of 1.01 hours would be rounded to 1.00 hours to provide that nearest fifteen minute rounding.
If the option "No Rounding" is selected, the Round Hours button will be disabled on all timesheet screens in your office.
Hours in Week
Sets the number of hours that your office considers a typical work week. For example, a value of 40 would be entered here for offices with an expected 8-hour work day, 5-days per week.
This value is used to determine whether an employee's timesheet is incomplete for purposes of sending email reminders, for identifying overtime hours in a Spreadsheet Report, or for generating an Incomplete Timesheets Report.
If an employee has an expected work week that is shorter or longer than your office's standard work week (for example, an employee working part-time for 16 hours per week), that person's expected hours should be entered in the Hours Per Week field of their user account. An Hours Per Week value entered in a user account record will override the Hours in Week entered in this field.
Hours in Day
Sets the number of hours that your office considers a typical work day. For example, a value of 7.5 would be entered here for offices with an expected 7-and-a-half hour work day (for a 37.5 hour work week).
This value is used to determine when an employee's effort hours can be considered 'overtime' for a given day, as described under the Spreadsheet Report.
Minimum Detail
Sets the minimum detail required for individual timesheet line or stopwatch entries.
By default, this is set at 'To Project', which enforces the entry of a Project for recording effort hours.
To enforce all staff time entry as Project / Activity, set this option to 'To Project - Activity'.
To enforce entry of Project / Activity / Task on all staff time entries, set this option to 'To Project - Activity - Task'.
Office Mailing Address
Opens a dialog box that allows you to change the mailing address used by your office. Your office's mailing address is displayed on your created invoices.
Week Ending Date
Note: this option is hidden once your system moves from 'trial' mode.
Opens your week ending date administration screen, allowing you to change your office-wide timesheet week ending date.
The date for your current week's timesheets will move forward automatically at the end of each week. Once your timesheet week ending date is set to your office's preference, this option can be ignored.
Switch Decimal Hours /
Hours:Minutes
Note: this option is hidden once your system moves from 'trial' mode.
Toggles your system-wide settings for time entry to decimal hour or hour:minute mode.
If your office prefers to record time with hundredths-of-hours accuracy (for example, entering 1.25 for 1 hour 15 minutes), this button will set that option.
Configure Reminder Email
Opens your email reminder administration screen, allowing you to set the contents of your weekly email reminder message, and the mail server settings through which your automated message will be sent.
Disable Automatic
Colon / Decimal
A checkbox which disables/enables an automatic colon or decimal when entering time in your timesheet.
If you would prefer to type your hours separator when entering time, toggle this option on.
Timer Timestamp
A checkbox which sets your preference for attaching a timestamp to your stopwatch timer comments.
Disable Timer Title Status Text
A checkbox which sets your preference for displaying updated timer status on your window's title and tool tip text for the minimized system tray or dock icon. If set to on, your timer window's title text will not be updated while your timer is active.
Send Email Reminders
A checkbox that determines whether or not reminder email messages will be sent to employees who have not saved a complete timesheet for their work week.
By default, email reminders are dispatched the moment your system changes to the next timesheet week (that is typically midnight of your week ending day). If you would prefer to have email reminders sent on the following morning, we can configure your system to delay email dispatch to an hour that better fits the time zone in which your staff operate.
Disable Animation
A checkbox that sets your preference for enabling and disabling screen animations.
Disable Fast Reports
A checkbox that sets your preference for enabling and disabling fast reports.
Some users prefer the workflow provided by legacy web file downloads, rather than the direct file download provided by modern web applications. If that's your preference, just toggle this option on, and your reports will be routed through a (much slower) secure web download.
We recommend keeping this option Off unless legacy web file downloads are absolutely essential for your office workflow.
Send Timesheet
(Dis)Approval Email
A checkbox that sets your system preference for enabling and disabling automated timesheet (dis)approval notification emails.
When enabled, a notification email is automatically dispatched to employees when their timesheet is approved or disapproved.
Enable Time/Expense Deletion
A checkbox that allows or blocks the ability to delete timesheet and expense claim records through your timesheet and expense claim administration screens.
This session-only setting is reset when you sign out and does not need to be saved to be activated. Toggling the option on or off is sufficient to adjust it for your Senomix session, and changing it will not enable your settings screen's save button.
When this checkbox is set to On, the delete toolbar button provided on your timesheet and expense claim administration screens will allow you to remove timesheet and expense claim records from your system.
Change Theme
Opens your change theme dialog, allowing you to change the colour theme used for your Senomix session.
Your theme preference can also be changed through the theme selector icon in your application header.
Set / Clear
Two-Factor Auth
Sets (or clears) two-factor authentication for your account.
The settings provided on this screen allow you to customize the behaviour and appearance of your Senomix system. Once you have adjusted this screen to your preferred settings, click the "Save" button to apply your changes.
Your week ending date administration screen allows you to set the day of the week on which your office's timesheet week end falls. Your week ending date will always be displayed as the rightmost column of your office's timesheets.
The auto-update option (which is set On by default) will automatically move your office's week ending date forward at midnight of your current week ending day. Once you have set your week ending date, auto-update will automatically change your week for you.
After setting your Senomix system's first week ending date for your office, you should never need to set the date again. To help ensure your office's data integrity, this screen will be blocked from access once your system has moved from a trial period to production use.
This screen is reached from your administration settings screen:

The buttons and fields provided on this screen as follows:
Home
Exits the screen and returns you to your main menu screen.
Back
Exits the screen and returns you to your settings screen.
Save
Saves your displayed week ending date and auto-update option.
Help
Opens a new web page displaying help for your current screen.
Current Date
Displays the date which is your office's current timesheet week ending date.
New Date
Allows you to select the date to which you would like to change your office's timesheet week end.
Auto Update
A checkbox which indicates whether your timesheet week ending date should automatically move forward to the next week when midnight strikes at that day's end (On), or if your timesheet week ending date is to be manually changed through this screen each week (Off).
It is recommended that auto update be left On to ensure your office's timesheets are always set to display for the current week.
Auto update must be left on if email reminders are to be sent for your office (automated email reminders for incomplete timesheets are sent the moment your office's week ending date changes).
After selecting a new week ending date and clicking the Save toolbar button, you will be prompted to confirm your week ending date selection:

After clicking Yes on that confirmation message, your office's week ending date will be changed to the date you have chosen:

Your timesheet reminder email screen allows you to set your office's automated email reminder preferences.
If email reminders have been activated for your office (through your admin settings screen), the message set on this screen will be emailed to any system users whose timesheet remains incomplete at the end of your office's week ending day.
By default, email reminders are dispatched the moment your system changes to the next timesheet week (that is typically midnight of your week ending day). If you would prefer to have email reminders sent on the following morning, we can configure your system to delay email dispatch to an hour that better fits the time zone in which your staff operate.

Buttons and fields provided on this screen are:
Home
Exits the screen and returns you to your main menu screen.
Back
Exits the screen and returns you to your settings screen.
Save
Saves your displayed email reminder settings.
Help
Opens a new web page displaying help for your current screen.
From Address
The email address to use in the reply field of your office's reminder messages.
From Name
The email name to use in the reply field of your office's reminder messages.
Subject
The subject to be shown for your email reminder messages.
Body
A multi-line text field in which the body of your email reminder message is to be entered.
Incomplete timesheets are identified for sending email reminders using the same logic as that used for creating an Incomplete Timesheets report. Each employee timesheet which would appear in an Incomplete Timesheets report will be sent an email reminder message when your office's week ending date automatically increments to the next week.
Reminder emails are sent to each employee at the email address noted in their user account record.
Automated email reminders will only be sent if the "Send Email Reminders" checkbox has been set to On in your admin settings screen. Reminders will only be sent to user accounts that are active.
Your QuickBooks Link screen lets you exchange data with QuickBooks Online.
This screen is reached from your links sub-menu:

Buttons and fields on this screen are:
Home
Exits the screen and returns you to your main menu screen.
Back
Exits the screen and returns you to your links sub-menu.
Help
Opens a new web page displaying help for your current screen.
Import
from QuickBooks
Imports all available items from QuickBooks.
An import will include all active QuickBooks Employee, Customer:Job, Service Item, Class, Vendor, and Expense Type records.
You must connect to QuickBooks to enable this button.
Export
to QuickBooks
Exports all approved timesheets.
You must connect to QuickBooks to enable this button.
Connect
to QuickBooks
Opens a secure web link to connect your Senomix system to your office's QuickBooks Online account.
After connecting to QuickBooks, the import/export buttons will be enabled to allow your exchange of data between systems.
After you have connected, this button will be hidden and replaced with a red "Disconnect" button. Clicking the red Disconnect button will disconnect your Senomix-to-QuickBooks link (you can reconnect to QuickBooks after disconnecting).
Your Senomix connection to QuickBooks is handled through Intuit's secure authorization system. After you have approved your connection to QuickBooks, the import and export buttons will be enabled to allow your secure data transmission.
After clicking the green "Connect to QuickBooks" button, a pop-up window will appear to receive your QuickBooks sign-in details. From there, enter your Intuit authorization details to grant permission to exchange data with Senomix.
Once your link has been set, your connect button will change to a red "Disconnect" button. You can unlink your Senomix account from QuickBooks by clicking that disconnect button.
All active QuickBooks Employee, Customer:Job, Service Item, Class, Chart of Accounts (Expense), and Vendor data can be imported from QuickBooks to your Senomix system by clicking the "Import from QuickBooks" button. After clicking that button, all data will be automatically transferred to your system.
Whenever you add or change an item in QuickBooks, you can click your "Import from QuickBooks" button to automatically update your Senomix records.
This is how your QuickBooks data maps to Senomix:
| QuickBooks | Senomix |
|---|---|
| Employee | User |
| Customer:Job | Project |
| Service Item | Activity |
| Class | Task |
| Chart of Accounts (Expense) | Expense Type |
| Vendor | Vendor |
QuickBooks Customers/Jobs are imported as Senomix projects, Service Items are imported as activities, and Classes are imported as tasks.
Items which are noted as being of type "Expense" in your QuickBooks Chart of Accounts are imported as Senomix expense types. QuickBooks Vendor records are imported as Senomix vendors.
Each active QuickBooks Employee will be imported to their own Senomix user account.
Imported Senomix users are assigned a default password and set inactive.
To enable an imported Senomix user:
Visit your User Administration screen, select the user record, update its password, toggle it 'active', then click 'Save' to apply your changes.
Once an imported user account is set active, that employee can sign in to Senomix and immediately start entering timesheets.
If a QuickBooks employee did not have an email address entered for their record, Senomix will create a default @example.com email address for them. As with the User record's password and 'active' state, email addresses can be changed from your User Administration screen.
If the count of imported Employee records does not fit in your Senomix system's user limit, any extra users will be skipped for import (your import results message will provide the count of any skipped users).
If you reach your Senomix system's user limit when importing, please contact us for assistance at support@senomix.com.
When a timesheet is Approved in Senomix, it will be queued for export to your QuickBooks system.
To export your queued list of timesheets, click the 'Export to QuickBooks' button. After your export has completed, your Senomix data will be saved in QuickBooks.
Disapproving a timesheet in Senomix before it has been exported to QuickBooks will remove the record from your export list. You can change a timesheet in Senomix as often as you would like before it has been exported to QuickBooks.
A timesheet will only be exported to QuickBooks once. However, if you disapprove a timesheet in Senomix after it has been exported to QuickBooks, the timesheet will be queued for export again when it is re-approved in Senomix.
If you do need to disapprove and change a timesheet in Senomix after it has been exported to QuickBooks, please delete the Time Activity items for that timesheet from QuickBooks before performing your next export. Re-exporting a timesheet to QuickBooks will re-enter that timesheet's Time Activity items (creating duplicates, if the existing Time Activity items are not deleted first). If you mistakenly re-export a timesheet before deleting its Time Activity items from QuickBooks, just delete the duplicate Time Activities from QuickBooks to remove the extra entries.
Comments entered in your Senomix timesheets will be exported to QuickBooks as Time Activity notes.
If you would prefer that your Senomix system not export any timesheet comments, please contact us at support@senomix.com. We can configure your system to exclude all timesheet comments from your QuickBooks export.
If you would like to occasionally exclude some timesheet comments from your QuickBooks export, just start or end the comment you would like to block with the text "noqb" (without the quotes). If a timesheet comment starts or ends with noqb, that comment will not be exported to QuickBooks.
You can also manually change (or delete) comments exported to QuickBooks by editing your Time Activity Notes after your export has completed.
If a timesheet entry is noted as Billable, a billing rate will be exported to QuickBooks with that Time Activity's hours.
A Senomix user's billing rate will be set to the "Bill Rate" value imported for that QuickBooks employee. The rate can be viewed (and changed) in the Default Rate attribute of your User Administration screen.
If you would like to set different billing rates for the different projects a user is working on, those rates can be set in your Billing Rate Administration Screen.
To apply the same billing rate to all staff assigned to a given project, you can set a Default Rate on that Senomix project record.
If you would rather not export a billing rate to QuickBooks, please clear the Senomix user Default Rate value. Senomix users without a billing rate defined will have their rate exported as $0.
If an Employee "Bill Rate" is changed in QuickBooks, be sure to also update the billing rates you have assigned in Senomix. You can use your Senomix time and billing reports to view the bill rates set for your users.
Items designated non-billable will not have a bill rate applied to their exported hours.
If your QuickBooks system is using the Payroll module, you can set a payroll item to be applied for each Senomix user.
The Payroll Item attribute can be changed in your Senomix User Administration Screen.
If a Payroll Item is set for a Senomix user, all Time Activities exported to QuickBooks will be assigned that employee's Payroll Item.
We're happy to help!
If you have any questions about your Senomix-to-QuickBooks link, please email us at support@senomix.com.
Your Xero Link screen lets you exchange data with your Xero Payroll, Projects, or core Accounting system. This screen is reached from your links sub-menu:

Buttons and fields on this screen are:
Home
Exits the screen and returns you to your main menu screen.
Back
Exits the screen and returns you to your links sub-menu.
Help
Opens a new web page displaying help for your current screen.
Import
from Xero
Imports all available items from Xero.
An import will include all 'In Progress' Xero records.
You must connect to Xero to enable this button.
Export
to Xero
Exports all approved timesheets.
You must connect to Xero to enable this button.
Connect
to Xero
Opens a secure web link to connect your Senomix system to your office's Xero account.
After connecting to Xero, the import/export buttons will be enabled to allow your exchange of data between systems.
After you have connected, this button will be replaced with a red "Disconnect" button. Clicking the red Disconnect button will disconnect your Senomix-to-Xero link (you can reconnect to Xero after disconnecting).
Senomix can link to Xero Payroll (as available for Australia, New Zealand and the United Kingdom) and Xero Projects.
Detection of Xero Payroll / Projects is handled automatically on connection to your Xero account.
If you do not have access to the Xero Payroll or Projects modules, a link will be made to your core Xero Accounting system.
Details about those options can be found below:
Your Senomix connection to Xero Payroll is handled through Xero's secure authentication system. After you have approved your connection to Xero, the import and export buttons will be enabled to allow secure transmission of your data.
After clicking the 'Connect to Xero' button, a pop-up window will appear to receive your Xero sign-in. From there, enter your Xero authorization details to grant permission to exchange data with Senomix.
Your office's Xero account must have Xero Payroll enabled to allow Payroll integration with Senomix. The Xero user account you use to connect to Senomix must be have permission to access your Xero Payroll.
Please note: Xero Payroll module access is only required for the user account you will use to connect to Xero in your Senomix Admin application. User accounts who will record time in Senomix do not need to be assigned Payroll module access in Xero.
Once your link has been set, your connect button will change to a red 'Disconnect' button. You can unlink your Senomix account from Xero by clicking that disconnect button.
All active Xero Payroll Earnings Rates, Tracking Categories and Employees can be imported from Xero to your Senomix system by clicking the 'Import from Xero' button. After clicking that button, all data will be automatically transferred to your system.
Whenever you add or change an item in Xero, you can click your 'Import from Xero' button to automatically update your Senomix records.
This is how your imported Xero data flows to Senomix:
| Xero | Senomix |
|---|---|
| Employees | User |
| Earning Rates | Project |
| Tracking Categories | Activity |
Xero Earning Rates are imported as Senomix projects. Tracking Categories (if enabled in Xero) are imported as Senomix activities. Employees set in your Xero Payroll system are imported as Senomix user accounts.
Only Earning Rates that track against hours in Xero will be imported.
If you do not want an Earning Rate to be available to employees for selection in Senomix (for example, a rate for managing employee long-term disability), that item can be set inactive in your Senomix Project admin screen. Inactive items will not be displayed for selection in end-user timesheets, but will remain available to Senomix admin users.
This is how your data exported from Senomix flows to Xero:
| Senomix | Xero |
|---|---|
| Timesheet Time Entries | Payroll Timesheets |
Senomix timesheet time entries are exported to your Xero payroll timesheets.
Only timesheets marked as Approved in Senomix are exported to Xero.
If a Xero timesheet already exists for an employee's pay period, exported hours will be automatically added to that timesheet.
A Xero timesheet must remain in 'Draft' status to receive exported hours. If a timesheet has been approved in Xero, it cannot be updated -- exported hours will be blocked, with an error message that identifies the timesheet which must be set back to 'Draft' status in Xero.
All Senomix projects, activities and user accounts must be imported from Xero to provide a direct link between your systems. However, once your project information has been imported to Senomix from Xero, you can add Task records in Senomix under the Senomix Activity (your Xero 'Tracking Categories') if you would like to track project time at an extra level of detail.
Task information can be entered in Senomix by adding your tasks under the activity imported from Xero.
When exporting approved timesheets to Xero, timesheet entries will be set under the Xero Tracking Category (the Senomix activity) for the chosen Earnings Rate. If you have selected a Senomix task for those hours, the hours will be summed to the parent Xero Tracking Category.
If you have not enabled Tracking Categories in Xero, exported hours will be summed to the parent Xero Earning Rate.
To add Projects, Users and Activities to Senomix, please create those Earning Rates, Tracking Categories and Employees in Xero, then import those records to Senomix.
If you have questions about adding Senomix tasks to your Xero activities, please do email us at support@senomix.com. We'll be happy to help!
Each Xero employee record assigned a payroll calendar will be imported to their own Senomix user account.
Imported Senomix users are assigned a default password and set inactive.
To enable an imported Senomix user: visit your Senomix User Administration screen, select the user record, update its password, toggle it 'active', then click 'Save' to apply your changes.
Once an imported user account is set active, that employee can sign in to Senomix and track their work.
Your staff can also use the 'Sign In with Xero' option on your Senomix sign-in screen to authenticate a Senomix session using Xero. Both 'Sign In with Xero' and standard Senomix sign-ins can be used.
If the count of imported user records does not fit in your Senomix system's user limit, any extra users will be skipped for import (your import results message will provide the count of any skipped users).
If you reach your Senomix system's user limit when importing, please contact us for assistance at support@senomix.com.
When a timesheet is marked Approved in Senomix, it will be queued for export to your Xero account.
To export your queued timesheets, click the 'Export to Xero' button. After your export has completed, your Senomix data will be saved in Xero.
To be valid for export to Xero, every hour entry on a timesheet must have a Project selected.
If you have enabled Tracking Categories in Xero, every hour entry must have both a Senomix Project and Activity selected for its timesheet line. Each timesheet entry corresponds to your Xero Earning Rates and Tracking Categories (if enabled) and, just like in Xero, a time entry cannot be set without selecting both an Earning Rate and Tracking Category for that time entry.
If you have disabled Tracking Categories in Xero, any time exported from Senomix that uses a tracking category will be summed to its parent Earnings Rate, with the Tracking Category ignored.
Different lists of Tracking Categories can be defined in Xero, but only one set of categories can be set active in your Xero Payroll Settings. If you change the list of Tracking Categories active in Xero, those categories will be added to Senomix on your next Xero import; however, the previously used tracking categories will not be accepted by Xero when exporting timesheets. If you change the list of Tracking Categories active in Xero, it is best to toggle any unused Tracking Categories inactive in Senomix to avoid their continued selection on user timesheets.
If you approve and export a timesheet that does not have a Project and Activity set for each line, that timesheet will be rejected by Xero, and your export will be halted at that timesheet.
Disapproving a timesheet in Senomix before it has been exported to Xero will remove the record from your export list. You can change a timesheet in Senomix as often as you would like before it has been exported to Xero.
A timesheet will only be exported to Xero once. However, if you disapprove a timesheet in Senomix after it has been exported to Xero, the timesheet will be queued for export again when it is re-approved in Senomix.
If you need to disapprove and change a timesheet in Senomix after it has been exported to Xero, please delete the payroll timesheet items for that employee's timesheet from Xero before performing your next export. Re-exporting a timesheet to Xero will re-enter that timesheet's time entries, creating duplicates if the existing time entries are not deleted first. If you mistakenly re-export a timesheet before deleting its time entries from Xero, just delete the duplicate time entries from Xero to remove the extra entries.
If your export to Xero is blocked due to an incomplete timesheet, the user account and week ending date of that timesheet will be noted in your export error message.
To correct a timesheet that will not export to Xero, please follow these steps:
- First, check Xero for any work hours that may have been partially exported for that timesheet. You can delete those time entries from Xero to clear the account for the re-export of your corrected timesheet.
- In Senomix, disapprove the timesheet record to allow it to be edited;
- Correct the timesheet in Senomix to ensure a Project and Activity is selected for each timesheet row; then
- Approve (and lock) the timesheet in Senomix, then click 'Export to Xero' again.
If you ever have questions about exporting timesheets to Xero, please do contact us for assistance at support@senomix.com. We'll be happy to help!
When work hours are exported to Xero, the billable state and billing rate for the time entries will be set to the values defined in Xero.
Xero ignores the billable state of hours recorded in Senomix. The setting of your Senomix 'billable' flag is not exported to Xero.
The billable/non-billable flag in your Senomix timesheets can be used to assist project tracking in your Senomix reports. However, the billing set in Xero for your imported hours will be the billable/non-billable state and billing rates you have defined for that work in Xero.
We'll be happy to help!
if you have Questions about your Senomix-to-Xero link, or have functionality you would like to see added, please do email us at support@senomix.com.
Your Senomix connection to Xero Projects is handled through Xero's secure authentication system. After you have approved your connection to Xero, the import and export buttons will be enabled to allow secure transmission of your data.
After clicking the 'Connect to Xero' button, a pop-up window will appear to receive your Xero sign-in. From there, enter your Xero authorization details to grant permission to exchange data with Senomix.
Your office's Xero account must have Xero Projects enabled to allow Projects integration with Senomix.
The Xero user account you use to connect to Senomix must be have permission to access your Xero Projects.
Please note: Xero Project module access is only required for the user account you will use to connect to Xero in your Senomix Admin application. User accounts who will record time in Senomix do not need to be assigned Project module access in Xero.
Your staff can record time in Senomix without needing Project access assigned to them in Xero.
Once your link has been set, your connect button will change to a red 'Disconnect' button. You can unlink your Senomix account from Xero by clicking that disconnect button.
All 'In Progress' Xero Projects, Tasks, and Project Users can be imported from Xero to your Senomix system by clicking the 'Import from Xero' button. After clicking that button, all data will be automatically transferred to your system.
Whenever you add or change an item in Xero, you can click your 'Import from Xero' button to automatically update your Senomix records.
This is how your imported Xero data flows to Senomix:
| Xero | Senomix |
|---|---|
| Project User | User |
| Project | Project |
| Task | Activity |
Xero Projects are imported as Senomix projects. Project Tasks are imported as Senomix activities. Project Users assigned to your Xero Projects are imported as Senomix user accounts.
Only projects noted as being 'In Progress' in Xero will be imported.
This is how your data exported from Senomix flows to Xero:
| Senomix | Xero |
|---|---|
| Timesheet Time Entries | Project Time Entries |
Senomix timesheet time entries are exported to your Xero project time entries.
Only timesheets marked as Approved in Senomix are exported to Xero.
All Senomix projects, activities and user accounts must be imported from Xero to provide a direct link between your systems. However, once your project information has been imported to Senomix from Xero, you can add Task records in Senomix under the Senomix Activity (your Xero 'Tasks') if you would like to track project time at an extra level of detail.
Task information can be entered in Senomix by adding your tasks under the activity imported from Xero.
When exporting approved timesheets to Xero, timesheet entries will be set under the Xero task (so, the Senomix activity) for the project. If you have selected a Senomix task for those hours, your Xero time entry comment text will note the name and identifier value of the Senomix task. This lets you track project work to an extra level of detail in Senomix, while still allowing an exact match to your Xero billing.
To add Projects, Users and Activities to Senomix, please create those Projects, Tasks and Project Users in Xero, then import those records to Senomix.
If you have questions about adding Senomix tasks to your Xero activities, please do email us at support@senomix.com. We'll be happy to help!
Each Xero user assigned to an in-progress Xero project will be imported to their own Senomix user account.
Imported Senomix users are assigned a default password and set inactive.
To enable an imported Senomix user: visit your Senomix User Administration screen, select the user record, update its password, toggle it 'active', then click 'Save' to apply your changes.
Once an imported user account is set active, that employee can sign in to Senomix and track their work.
Your staff can also use the 'Sign In with Xero' option on your Senomix sign-in screen to authenticate a Senomix session using Xero. Both 'Sign In with Xero' and standard Senomix sign-ins can be used.
If the count of imported user records does not fit in your Senomix system's user limit, any extra users will be skipped for import (your import results message will provide the count of any skipped users).
If you reach your Senomix system's user limit when importing, please contact us for assistance at support@senomix.com.
When a timesheet is marked Approved in Senomix, it will be queued for export to your Xero account.
To export your queued timesheets, click the 'Export to Xero' button. After your export has completed, your Senomix data will be saved in Xero.
To be valid for export to Xero, every hour entry on a timesheet must have both a Project and Activity selected for its timesheet line. Each timesheet entry corresponds to your Xero Projects and Project Tasks and, just like in Xero, a time entry cannot be set without selecting both a project and task for that time entry.
If you approve and export a timesheet that does not have a Project and Activity set for each line, that timesheet will be rejected by Xero, and your export will be halted at that timesheet.
Disapproving a timesheet in Senomix before it has been exported to Xero will remove the record from your export list. You can change a timesheet in Senomix as often as you would like before it has been exported to Xero.
A timesheet will only be exported to Xero once. However, if you disapprove a timesheet in Senomix after it has been exported to Xero, the timesheet will be queued for export again when it is re-approved in Senomix.
If you need to disapprove and change a timesheet in Senomix after it has been exported to Xero, please delete the Time Entry items for that timesheet from Xero before performing your next export. Re-exporting a timesheet to Xero will re-enter that timesheet's time entries, creating duplicates if the existing time entries are not deleted first. If you mistakenly re-export a timesheet before deleting its time entries from Xero, just delete the duplicate time entries from Xero to remove the extra entries.
If your export to Xero is blocked due to an incomplete timesheet, the user account and week ending date of that timesheet will be noted in your export error message.
To correct a timesheet that will not export to Xero, please follow these steps:
- First, check Xero for any work hours that may have been partially exported for that timesheet. You can delete those time entries from Xero to clear the account for the re-export of your corrected timesheet.
- In Senomix, disapprove the timesheet record to allow it to be edited;
- Correct the timesheet in Senomix to ensure a Project and Activity is selected for each timesheet row; then
- Approve (and lock) the timesheet in Senomix, then click 'Export to Xero' again.
If you ever have questions about exporting timesheets to Xero, please do contact us for assistance at support@senomix.com. We'll be happy to help!
Comments entered in your Senomix timesheets will be exported to Xero as time entry comments.
If you would prefer that your Senomix system not export any timesheet comments, please contact us at support@senomix.com. We can configure your system to exclude all timesheet comments from your Xero export.
If you would like to occasionally exclude some timesheet comments from your Xero export, just start or end the comment you would like to block with the text 'noqb' (without the quotes). If a timesheet comment starts or ends with noqb, that comment will not be exported to Xero.
You can also manually change (or delete) comments exported to Xero by editing your time entry comments in Xero after your export has completed.
When work hours are exported to Xero, the billable state and billing rate for the time entries will be set to the values defined in Xero.
Xero ignores the billable state of hours recorded in Senomix. The setting of your Senomix 'billable' flag is not exported to Xero.
The billable/non-billable flag in your Senomix timesheets can be used to assist project tracking in your Senomix reports. However, the billing set in Xero for your imported hours will be the billable/non-billable state and billing rates you have defined for their tasks in Xero.
We'll be happy to help!
if you have Questions about your Senomix-to-Xero link, or have functionality you would like to see added, please do email us at support@senomix.com.
If your office is not using the Xero Payroll or Projects modules, your Senomix link will connect to Xero's core Accounting data.
Your Senomix connection to Xero Accounting is handled through Xero's secure authentication system. After you have approved your connection to Xero, the import button will be enabled to allow secure transmission of your data.
Please note:
The Xero Payroll and Projects modules can import your Senomix timesheets
BUT!
Xero does not provide a direct timesheet import without enabling those modules.
If you would prefer not to use Xero Payroll or Projects,
please contact us at support@senomix.com
for an overview of the work hour export options available to you.
After clicking the 'Connect to Xero' button, a pop-up window will appear to receive your Xero sign-in. From there, enter your Xero authorization details to grant permission to exchange data with Senomix.
The Xero user account you use to connect to Senomix must be have permission to access your Xero Accounting data.
Xero access is only required for the user account you will use to connect to Xero in your Senomix Admin application. User accounts who will record time in Senomix do not need to be assigned access in Xero.
Once your link has been set, your connect button will change to a red 'Disconnect' button. You can unlink your Senomix account from Xero by clicking that disconnect button.
All active Xero Employees, Contacts, Items and Tracking Categories can be imported from Xero to your Senomix system by clicking the 'Import from Xero' button. After clicking that button, all data will be automatically transferred to your system.
Whenever you add or change an item in Xero, you can click your 'Import from Xero' button to automatically update your Senomix records.
This is how your imported Xero data flows to Senomix:
| Xero | Senomix |
|---|---|
| Employees | User |
| Contacts | Project |
| Items | Activity |
| Tracking Categories | Task |
Xero Contacts are imported as Senomix projects. Xero Items designated in Xero as 'Sold' are imported as Senomix activities. Tracking Categories (if enabled in Xero) are imported as Senomix tasks. Employees are imported as Senomix user accounts.
All active Xero Contacts will be imported.
All active Xero Employees will be imported, with the user's sign-in email address set to [firstname].[lastname]@example.com. That email address can be updated to your employee's actual email address when enabling their record for use. You can then click the 'Send Welcome Email' button in Senomix to deliver all sign-in information direct to that employee.
If you do not want a Contact, Item or Tracking Category to be available to employees for timesheet selection (for example, a supplier or employee contact record), that item can be set inactive in your Senomix Project, Activity or Task admin screens. Inactive items will not be displayed for selection in end-user timesheets, but will remain available to Senomix admin users.
Xero does not provide a direct timesheet link for exporting work hours to Xero's core accounting system.
Senomix reports can be used to create effort hour and billing summaries you can use to complete your Xero invoices or update other information in your Xero system.
A direct timesheet export link is available if your office uses the Xero Payroll or Projects modules.
For more information about the time export options available to you, please contact us at support@senomix.com.
We'll be happy to help!
if you have Questions about your Senomix-to-Xero link, or have functionality you would like to see added, please do email us at support@senomix.com.
Your App Links menu screen provides access to app integration with the MYOB, QuickBooks and Xero accounting systems.

The available options which can be reached from this screen are:
Home
Exits the screen and returns you to your main menu.
Back
Exits the screen and returns you to your configuration sub-menu.
Help
Opens a new web page displaying help for your current screen.
MYOB Link
Opens your MYOB Link screen, allowing data exchange with your office's MYOB account.
QuickBooks Link
Opens your QuickBooks Link screen, allowing data exchange with your office's QuickBooks Online system.
Xero Link
Opens your Xero Link screen, allowing data exchange with your office's Xero account.
Your MYOB Link screen lets you exchange data with your MYOB accounting application.
This screen is reached from your App Links sub-menu:

Buttons and fields on this screen are:
Home
Exits the screen and returns you to your main menu screen.
Back
Exits the screen and returns you to your app links sub-menu.
Help
Opens a new web page displaying help for your current screen.
Import
from MYOB
Imports all available items from MYOB.
An import will include all 'Active' MYOB records.
You must connect to MYOB to enable this button.
Export
to MYOB
Exports all approved timesheets.
You must connect to MYOB to enable this button.
Connect
to MYOB
Opens a secure web link to connect your Senomix system to your office's MYOB account.
After connecting to MYOB, the import/export buttons will be enabled to allow your exchange of data between systems.
After you have connected, this button will be replaced with a red "Disconnect" button. Clicking the red Disconnect button will disconnect your Senomix-to-MYOB link (you can reconnect to MYOB after disconnecting).
Your Senomix connection to MYOB is handled through MYOB's secure authentication system. After you have approved your connection to MYOB, the import and export buttons will be enabled to allow secure transmission of your data.
After clicking the 'Connect to MYOB' button, a pop-up window will appear to receive your MYOB sign-in. From there, enter your MYOB authorization details to grant permission to exchange data with Senomix.
If your MYOB account has more than one MYOB Company File, we will need to specify the exact company file to use for your Senomix account. We'll be happy to help with that! Just send an email to support@senomix.com mentioning the name of the MYOB Company File you would like to use.
You can link Senomix with as many MYOB Company Files as you would like, but each connection will need its own Senomix account.
The MYOB user account you use to connect to Senomix must be have permission to access your MYOB Customer, Activity, Job, Employee and Time Billing records.
Please note: MYOB access is only required for the user account you will use to connect to MYOB in your Senomix Admin application. User accounts who will record time in Senomix do not need MYOB account access.
Your staff can record time in Senomix without needing MYOB account access.
Once your link has been set, your connect button will change to a red 'Disconnect' button. You can unlink your Senomix account from MYOB by clicking that disconnect button.
All 'Active' MYOB Customers, Activities, Jobs and Employees can be imported from MYOB to your Senomix system by clicking the 'Import from MYOB' button. After clicking that button, all data will be automatically transferred to your system.
Whenever you add or change an item in MYOB, you can click your 'Import from MYOB' button to automatically update your Senomix records.
This is how your imported MYOB data flows to Senomix:
| MYOB | Senomix |
|---|---|
| Employee | User |
| Customer | Project |
| Activity | Activity |
| Job | Task |
MYOB Customers are imported as Senomix projects. Customer Activities are imported as Senomix activities. MYOB Jobs are imported as Senomix tasks. Employees entered in MYOB are imported as Senomix user accounts.
Only items noted as being 'Active' in MYOB will be imported.
This is how your data exported from Senomix flows to MYOB:
| Senomix | MYOB |
|---|---|
| Timesheet Time Entries | MYOB Activity Slips |
Senomix timesheet time entries are exported to your MYOB activity slips.
Only timesheets marked as Approved in Senomix are exported to MYOB.
All Senomix projects, activities, tasks and user accounts must be imported from MYOB to provide a direct link between your systems.
To add projects, activities, tasks and users to Senomix, please create those Customer, Activity, Job and Employee records in MYOB, then import those records to Senomix.
Each active Employee in MYOB will be imported to their own Senomix user account.
Imported Senomix users are assigned a random password and set inactive.
To enable an imported Senomix user: visit your Senomix User Administration screen, select the user record, update its password, toggle it 'active', then click 'Save' to apply your changes.
Once an imported user account is set active, that employee can sign in to Senomix and track their work.
You can send a 'welcome' email to any system user to provide their sign-in details. Your staff can also reset their password when signing in for the first time if you would rather not assign a password for them.
Please note: if an employee record in MYOB has multiple email addresses assigned to them, the first email address listed for their record will be used to create their Senomix account (you can update that email for their Senomix user account through your user admin screen). If no email is specified for a MYOB employee record, a placeholder @example.com email address will be created using their first and last name.
If the count of imported user records does not fit in your Senomix system's user limit, any extra users will be skipped for import (your import results message will provide the count of any skipped users).
If you reach your Senomix system's user limit when importing, please contact us for assistance at support@senomix.com.
When a timesheet is marked Approved in Senomix, it will be queued for export to your MYOB account.
To export your queued timesheets, click the 'Export to MYOB' button. After your export has completed, your Senomix data will be saved in MYOB activity slips.
To be valid for export to MYOB, every hour entry on a timesheet must have both a Project and Activity selected for its timesheet line (so, a MYOB Customer and Activity). Senomix Task values (MYOB Jobs) are optional. Each timesheet entry corresponds to your MYOB Customer, Activity and Job entries and, just like in MYOB, an activity slip cannot be set without selecting both a customer and activity for that time entry.
If you approve and export a timesheet that does not have a Project and Activity set for each line, that timesheet will be rejected by MYOB, and your export will be halted at that timesheet.
Disapproving a timesheet in Senomix before it has been exported to MYOB will remove the record from your export list. You can change a timesheet in Senomix as often as you would like before it has been exported to MYOB.
A timesheet will only be exported to MYOB once. However, if you disapprove a timesheet in Senomix after it has been exported to MYOB, the timesheet will be queued for export again when it is re-approved in Senomix.
If you need to disapprove and change a timesheet in Senomix after it has been exported to MYOB, please delete the Activity Slip items for that timesheet from MYOB before performing your next export. Re-exporting a timesheet to MYOB will re-enter that timesheet's time entries, creating duplicate MYOB activity slips if the existing time entries are not deleted first. If you mistakenly re-export a timesheet before deleting its activity slips from MYOB, just delete the duplicate activity slips from MYOB to remove the extra entries.
If your export to MYOB is blocked due to an incomplete timesheet, the user account and week ending date of that timesheet will be noted in your export error message.
To correct a timesheet that will not export to MYOB, please follow these steps:
- First, check MYOB for any work hours that may have been partially exported for that timesheet. You can delete those activity slips from MYOB to clear the account for the re-export of your corrected timesheet.
- In Senomix, disapprove the timesheet record to allow it to be edited;
- Correct the timesheet in Senomix to ensure a Project and Activity is selected for each timesheet row; then
- Approve (and lock) the timesheet in Senomix, then click 'Export to MYOB' again.
If you ever have questions about exporting timesheets to MYOB, please do contact us for assistance at support@senomix.com. We'll be happy to help!
Comments entered in your Senomix timesheets will be exported to MYOB as activity slip notes.
MYOB only allows 255 characters for each activity slip note. If a Senomix time entry comment has more than 255 characters, that comment will be truncated at the 255 character mark when exporting.
If you would prefer that your Senomix system not export any timesheet comments, please contact us at support@senomix.com. We can configure your system to exclude all timesheet comments from your MYOB export.
If you would like to occasionally exclude some timesheet comments from your MYOB export, just start or end the comment you would like to block with the text 'noqb' (without the quotes). If a timesheet comment starts or ends with noqb, that comment will not be exported to MYOB.
You can also manually change (or delete) comments exported to MYOB by editing your activity slip notes in MYOB after your export has completed.
When work hours are exported to MYOB, the billable state and billing rate for the time entries will be set to the values defined in MYOB.
MYOB ignores the billable state of hours recorded in Senomix. The setting of your Senomix 'billable' flag is not exported to MYOB.
The billable/non-billable flag in your Senomix timesheets can be used to assist project tracking in your Senomix reports. However, the billing set in MYOB for your imported hours will be the billable/non-billable state and billing rates you have defined for work in MYOB.
We'll be happy to help!
if you have Questions about your Senomix-to-MYOB link, or have functionality you would like to see added, please do email us at support@senomix.com.
If you have any questions please contact us by email at support@senomix.com.
After a set of timesheet records have been exported as a database export (txt) file, the text can be imported into another application or database through that system's import utility. The text is set in a fixed format, with all unique identifiers for the timesheet records and their associated billing codes provided within the data for each record.
Each line of the flat file data provides the information for a distinct timesheet entry, which is the intersection on a timesheet grid of the billing codes and the day of the week for an employee's timesheet. A distinct timesheet entry exists for each entry of hours on a timesheet.
The timesheet to which a given timesheet entry belongs can be identified by the timesheet Id column included in the flat file output, with the employee related to that timesheet identified by their employee number. A specific timesheet entry can be identified by the timesheet Id, project, activity and task billing codes, billable status and the day Id. Billing rates are applied to each entry as defined by the rates registered for each user and project (as described for Invoice Reports).
The format of the flat file data, with the first character on the left of a printed line listed as Position 1, is as follows:
| Position | Data | Description |
|---|---|---|
| 1-20 | Employee Number | The employee number of the employee corresponding to the timesheet entry record. |
| 21-30 | Username | The (discontinued) username value for the record. System versions at v5.2 and later can disregard this field (it has been kept to ensure backward compatibility with earlier systems). |
| 31-50 | First Name | The first name of the employee. |
| 51-70 | Last Name | The last name of the employee. |
| 71-170 | E-Mail Address | The email address of the employee. |
| 171-195 | Phone | The work phone number and extension (if any) of the employee. |
| 196-220 | Unused | Unused |
| 221-225 | Administrator flag | A boolean value indicating whether or not the employee is an administrative user. This value is represented by either of the words 'true' or 'false'. |
| 226-230 | Active flag | A boolean value indicating whether or not the employee is an Active user. This value is represented by either of the words 'true' or 'false'. |
| 231-241 | Timesheet Id | The uniquely identifying Timesheet Id assigned to the timesheet. |
| 242-266 | Week Ending Date | The Week Ending Date corresponding to the timesheet. This date is presented in the form "DD-MM-YYYY HH:MM:SS", with the hours, minutes and seconds all set to 0. |
| 267-291 | Submitted Date | The Submitted Date corresponding to the timesheet. This date and time value is presented in the form "DD-MM-YYYY HH:MM:SS" |
| 292-341 | Project | The Project billing code corresponding to the timesheet entry. The billing code is represented as the unique code corresponding to the project of the timesheet entry. |
| 342-391 | Activity | The Activity billing code corresponding to the timesheet entry. The billing code is represented as the unique code corresponding to the project and activity on the timesheet entry. |
| 392-441 | Task | The Task billing code corresponding to the timesheet entry. The billing code is represented as the unique code corresponding to the project, activity and task on the timesheet entry. |
| 442-461 | Hours | The hours entered for the timesheet entry. |
| 462-472 | Day of the Week | An integer value indicating the day of the week which corresponds to the timesheet entry. Days of the week correspond with these numbers as follows: 0 Sunday 1 Monday 2 Tuesday 3 Wednesday 4 Thursday 5 Friday 6 Saturday |
| 473-492 | Billing Rate | The hourly billing rate to be applied to the hours of the listed timesheet entry. |
| 493-503 | Comment Size | An integer value indicating the size of any comment text which is associated with the timesheet entry. If there is no comment text for the entry, this value will be set to 0. |
| 504-5503 | Timesheet Comment | The comment text which has been associated with the timesheet entry. Up to 5000 characters can be entered for a timesheet entry comment, with the number of characters stored for the comment indicated in the Comment Size attribute preceding this data. If there is no comment for a timesheet entry, this area will contain 5000 space characters. As a timesheet comment is right-padded with space characters to bring it to a fixed length of 5000 characters, the comment itself can be extracted from this block of text by fetching a sub-string from position 504 to the length of text indicated in the Comment Size attribute. Carriage returns within the comment are indicated by a "¶" character and can be replaced with the receiving database's character combination for carriage returns as desired. |
| 5504-5513 | Entry Date | The Date for which the timesheet entry was recorded (this can also be determined from the Week Ending Date and Day of the Week attributes). This date value is presented in the form "DD-MM-YYYY". |
| 5514-5524 | Billable Status | An integer value indicating whether the time entry is for a billable or non-billable item of work. The int values for that billable status are as follows: 0 Non-billable work 1 Billable work |
After a set of expense claim records have been exported as a database export (txt) file, the text can be imported into another application or database through that system's import utility. The text is set in a fixed format, with all unique identifiers for the expense claim records and their associated billing codes provided within the data for each record.
Each line of the flat file data provides the information for a distinct expense claim Entry. A distinct expense claim entry exists for each entered line of an expense claim.
The expense claim to which a given expense claim entry belongs can be identified by the expense claim Id column included in the flat file output, with the system user related to that expense claim identified by their employee number.
The format of the flat file data, with the first character on the left of a printed line listed as Position 1, is as follows:
| Position | Data | Description |
|---|---|---|
| 1-20 | Employee Number | The Employee Number of the employee corresponding to the expense claim record. |
| 21-30 | Username | The (discontinued) username value for the record. System versions at v5.2 and later can disregard this field (it has been kept to ensure backward compatibility with earlier systems). |
| 31-50 | First Name | The First Name of the employee. |
| 51-70 | Last Name | The Last Name of the employee. |
| 71-81 | Expense Claim Id | The uniquely identifying Expense Claim Id assigned by Senomix to the expense claim record. |
| 82-1081 | Vendor Name | The name of the vendor noted for the expense claim, or the text "<< NONE >>" if no vendor was indicated. |
| 1082-1106 | Claim Date | The Date provided for the full Expense Claim. This date is presented in the form "DD-MM-YYYY HH:MM:SS", with the hours, minutes and seconds all set to 0. |
| 1107-1111 | Approved Flag | A boolean value indicating whether or not the expense claim has been approved or disapproved. If this flag is false and the Approved User is blank, then the expense claim is still pending approval. |
| 1112-1131 | Approved User | The employee no. of the user which approved or disapproved the expense claim. If this value is blank, the expense claim is still pending approval. |
| 1132-1156 | Approved Date | The Date and Time on which the expense claim was either approved or disapproved. If the Approved User is blank, the expense claim has not yet been approved and this field will be blank. |
| 1157-1206 | Project Code | The project code corresponding to the expense claim entry. |
| 1207-1462 | Project Name | The project billing code Name corresponding to the expense claim entry. |
| 1463-1512 | Activity Code | The activity code corresponding to the expense claim entry. If no activity was indicated for the entry, this value will be blank. |
| 1513-1768 | Activity Name | The activity billing code name corresponding to the expense claim entry. If no activity was indicated for the entry, this value will be blank. |
| 1769-1818 | Task Code | The task code corresponding to the expense claim entry. If no task was indicated for the entry, this value will be blank. |
| 1819-2074 | Task Name | The task billing code name corresponding to the expense claim entry. If no task was indicated for the entry, this value will be blank. |
| 2075-3074 | Expense Type | The expense type noted for the expense claim entry, or the text "<< NONE >>" if no expense type was indicated. |
| 3075-3099 | Entry Date | The date provided for the expense claim entry. This date is presented in the form "DD-MM-YYYY HH:MM:SS", with the hours, minutes and seconds all set to 0. |
| 3100-3109 | Amount | The currency amount of the expense claim entry. |
| 3110-4109 | Details | The text details provided for the expense claim entry. |
| 4110-4120 | Billable Status | An integer value indicating whether the expense claim entry is for a billable or non-billable item. The int values for that billable status are as follows: 0 Non-billable item 1 Billable item |
After a set of timesheet records have been exported as a database export (csv) file, the file can be imported into another application or database via the appropriate data loading utility (for example, via the Microsoft Access or Sage Accounting data import processes). The exported data is set in a fixed column format, outlined below.
Each line of the CSV export file data provides the information for a distinct timesheet entry, which is the intersection on a timesheet grid of the billing codes and the day of the week for an employee's Timesheet. A distinct timesheet entry exists for each entry of hours on a timesheet.
The timesheet to which a given timesheet entry belongs can be identified by the timesheet Id column included in the flat file output, with the employee related to that timesheet identified by their employee number. A specific timesheet entry can be identified by the timesheet Id, project, activity and task billing codes, billable status and the day Id. Billing rates are applied to each entry as defined by the rates registered for each user and project (as described for Invoice Reports).
The format of the CSV file data, with the first column on the left of a printed line listed as Column 1, is as follows:
| Column | Data | Description |
|---|---|---|
| 1 | Employee Number | The employee number of the employee corresponding to the timesheet entry record. |
| 2 | Username | The (discontinued) username value for the record. System versions at v5.2 and later can disregard this field (it has been kept to ensure backward compatibility with earlier systems). |
| 3 | First Name | The first name of the employee. |
| 4 | Last Name | The last name of the employee. |
| 5 | Email Address | The email address of the employee. |
| 6 | Phone | The work phone number and extension (if any) of the employee. |
| 7 | Administrator flag | A boolean value indicating whether or not the employee is an administrative user. This value is represented by either of the words 'true' or 'false'. |
| 8 | Active flag | A boolean value indicating whether or not the employee is an active user. This value is represented by either of the words 'true' or 'false'. |
| 9 | Timesheet Id | The uniquely identifying timesheet Id assigned by Senomix to the timesheet record. |
| 10 | Week Ending Date | The week ending date corresponding to the timesheet. This date is presented in the form "DD-MM-YYYY HH:MM:SS", with the hours, minutes and seconds all set to 0. |
| 11 | Submitted Date | The submitted date corresponding to the timesheet. This date and time value is presented in the form "DD-MM-YYYY HH:MM:SS". |
| 12 | Project Code | The project code attribute of the project corresponding to the timesheet entry. |
| 13 | Project Name | The name of the project billing code corresponding to the timesheet entry. |
| 14 | Activity Code | The activity code attribute of the activity corresponding to the timesheet entry. |
| 15 | Activity Name | The name of the activity billing code corresponding to the timesheet entry. |
| 16 | Task Code | The task code attribute of the task corresponding to the timesheet entry. |
| 17 | Task Name | The name of the task billing code corresponding to the timesheet entry. |
| 18 | Billable Status | An integer value indicating whether the time entry is for a billable or non-billable item of work. The int values for that billable status are as follows: 0 Non-billable work 1 Billable work |
| 19 | Day of the Week | An integer value indicating the day of the week which corresponds to the timesheet entry. Days of the week correspond with these numbers as follows: 7 Sunday 8 Monday 9 Tuesday 10 Wednesday 11 Thursday 12 Friday 13 Saturday |
| 20 | Hours | The hours entered for the timesheet entry. |
| 21 | Billing Rate | The hourly billing rate to be applied to the hours of the listed timesheet entry. |
| 22 | Timesheet Comment | The comment text which has been associated with the timesheet entry. Up to 5000 characters can be entered for a timesheet entry comment, with the number of characters stored for the comment indicated in the Comment Size attribute preceding this data. If there is no comment for a timesheet entry, this area will contain 5000 space characters. As a timesheet comment is right-padded with space characters to bring it to a fixed length of 5000 characters, the comment itself can be extracted from this block of text by fetching a sub-string from position 504 to the length of text indicated in the Comment Size attribute. Carriage returns within the comment are indicated by a "¶" character and can be replaced with the receiving database's character combination for carriage returns as desired. |
| 23 | Entry Date | The Date for which the Timesheet Entry was recorded (this can also be determined from the Week Ending Date and Day of the Week attributes). This date value is presented in the form "DD-MM-YYYY". |
After a set of expense claim records have been exported as a database export (csv) file, the file can be imported into another application or database via the appropriate data loading utility (for example, via the Microsoft Access or Sage Accounting data import processes). The exported data is set in a fixed column format, outlined below.
Each line of the CSV export file data provides the information for a distinct expense claim entry. A distinct expense claim entry exists for each entered line of an expense claim.
The expense claim to which a given expense claim entry belongs can be identified by the expense claim Id column included in the flat file output, with the system user related to that expense claim identified by their employee number.
The format of the flat file data, with the first column on the left of a printed line listed as Column 1, is as follows:
| Column | Data | Description |
|---|---|---|
| 1 | Employee Number | The employee number of the employee corresponding to the expense claim entry. |
| 2 | Username | The (discontinued) username value for the record. System versions at v5.2 and later can disregard this field (it has been kept to ensure backward compatibility with earlier systems). |
| 3 | First Name | The first name of the employee. |
| 4 | Last Name | The last name of the employee. |
| 5 | Expense Claim Id | The uniquely identifying expense claim Id assigned by Senomix to the expense claim record. |
| 6 | Vendor Name | The name of the vendor noted for the expense claim, or the text "<< NONE >>" if no vendor was indicated. |
| 7 | Claim Date | The date provided for the full expense claim. This date is presented in the form "DD-MM-YYYY HH:MM:SS", with the hours, minutes and seconds all set to 0. |
| 8 | Approved Flag | A boolean value indicating whether or not the expense claim has been approved or disapproved. If this flag is false and the approved user is blank, then the expense claim is still pending approval. |
| 9 | Approved User | The employee no. of the user which approved or disapproved the expense claim. If this value is blank, the expense claim is still pending approval. |
| 10 | Approved Date | The date and time on which the expense claim was either approved or disapproved. If the approved user is blank, the expense claim has not yet been approved and this field will be blank. |
| 11 | Project Code | The project code corresponding to the expense claim entry. |
| 12 | Project Name | The project billing code name of the entry. |
| 13 | Activity Code | The activity code corresponding to the expense claim entry. If no activity was indicated for the entry, this value will be blank. |
| 14 | Activity Name | The activity billing code name corresponding to the expense claim entry. If no activity was indicated for the entry, this value will be blank. |
| 15 | Task Code | The task code corresponding to the expense claim entry. If no task was indicated for the entry, this value will be blank. |
| 16 | Task Name | The task billing code name corresponding to the expense claim entry. If no task was indicated for the entry, this value will be blank. |
| 17 | Expense Type | The expense type noted for the expense claim entry, or the text "<< NONE >>" if no expense type was indicated. |
| 18 | Entry Date | The Date provided for the Expense Claim entry. This date is presented in the form "DD-MM-YYYY HH:MM:SS", with the hours, minutes and seconds all set to 0. |
| 19 | Amount | The currency amount of the expense claim entry. |
| 20 | Details | The text details provided for the expense claim entry. |
| 21 | Billable Status | An integer value indicating whether the Expense Claim entry is for a billable or non-billable item. The int values for that billable status are as follows: 0 Non-billable item 1 Billable item |