Reports - Quick Reference
A guide for the reporting functionality of your time tracking software.
The information in this guide can also be found in your Administration Application Users Guide, along with examples of your available reports.
Your create report screen allows you to create reports for the review and analysis of your office's recorded timesheet and expense claim information.
This screen is reached from your administration or reports application's main menu screen:

The buttons and fields provided on this screen as follows:
Home / Back
Exits the screen and returns you to your main menu screen.
Clear
Clears all report filter elements, resetting the report filter to that set for your chosen report.
Create Report
Requests a report with the report filter and output options you have selected.
Help
Opens a new web page displaying help for your current screen.
Report Review
Created Web Page reports will be opened for display in your Report Review screen. In that screen, you can choose to save your report to your computer's hard drive by clicking the green "Save to Disk" button:
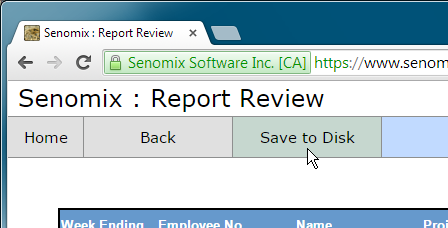
After clicking the "Save to Disk" button, your report will be saved to your computer's Downloads folder and be available for your review in a new web browser window. Depending upon your web browser's behaviour for saving files, you may be presented with a "Save As" dialog box, a "File Saved" notification or, as with Mac OS X Safari, your file may be silently saved to your computer without showing any notification message at all.
Using Mac OS X Safari?
Please note: The Safari web browser provided with Mac computers
will save your reports to your Downloads folder
without displaying a confirmation message.
After selecting 'Save to Disk' or creating an export report,
you will be able to find your saved report files in your Downloads folder.
When creating a report for Microsoft Excel, your report will be saved to your computer's Downloads folder with the name of "senomixReport.xls" and (for the behaviour of most web browsers) be automatically opened in Excel for your review.
When creating data export reports, your report will be automatically saved to your computer's Downloads folder in the file format expected for that export.
As reports are saved, they will be numbered for you (for example, "senomixReport (12).xls") in the order they are created. You can rename your saved reports as you would like, and we recommend deleting old reports from your Downloads folder or moving them to your personal directories once they are no longer required for your immediate reference.
Report Type
The report type section of your screen:

Allows you to choose the report you would like to create and the format in which it will be created. Reports can be created as html web pages or as formatted Microsoft Excel spreadsheets (the option to which these buttons are reset to can be chosen in your application settings screen). Data export reports will always be created as plain text before being saved to your computer's Downloads folder.
Report options for timesheet or expense claim records are available, with available categories of analysis, estimate, financial, and export reports providing a list of available reports in the rightmost selector.
The reports listed will change depending upon the report type and category you have chosen, with the reports covering data analysis, estimate, etc. as appropriate for your selection.
If your reports access rights are restricted to non-financial or personal reports, the reports available to you will be limited accordingly. For example, if your user account was set to have access only to non-financial reports, expense claims would not be available for your reports, and timesheet report options for financial and export reports would also be blocked from your use.
If a report option does not require a particular report filter item, those selection options will be disabled when your report is selected. For example, an Incomplete Timesheets report has no need for the employee, user group, project group, billing code or billable state selectors, and so those items will be cleared and disabled for that report option.
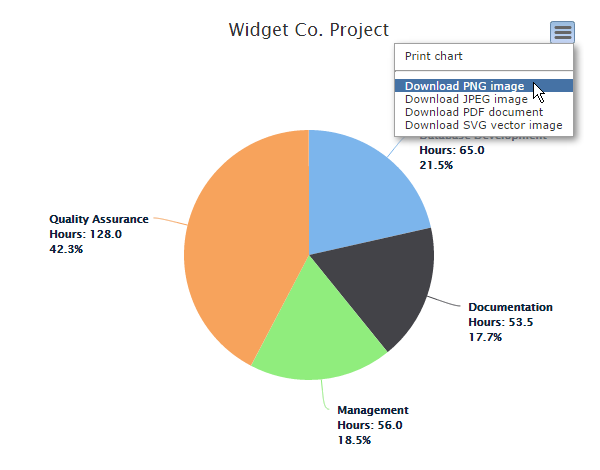
The options for chart reports allow you to add options for saving the chart images (for example, if you wished to save a chart for attachment within an offline document) or adjusting its colours and orientation to provide a more presentation-friendly appearance. These options are only enabled when a chart report has been selected.
The Enable Chart Save option will add a save widget to each chart presented in your chart review screen, providing a selection menu which will allow you to print or save the chart image as you would prefer:
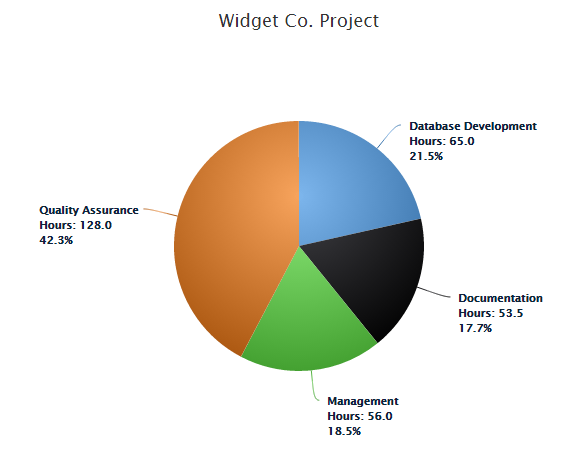
The Chart Shaded Colours option will add a gradient fill shading to your charts:
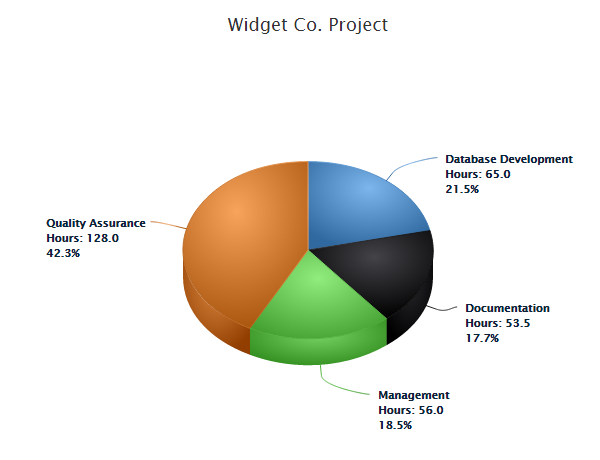
With the Draw 3D Charts option displaying your output with a 3D orientation (only available for pie charts):
Examples of all reports provided through these options can be found in your admin application's create report and chart review screen documentation.
Report Filter
The report filter section of your screen:

Allows you to refine the data which will appear in your report by specifying date ranges, groups of employees, particular projects, or shared project codes as suits your preference. For example, you could request a report which displays all Analysis work performed by your Engineering group of employees for all work related to the Widgets Inc. company for the month of July.
A description of each of these filter elements, along with examples of how and why you might use them, are described below.
Date From / Date To
What this does:
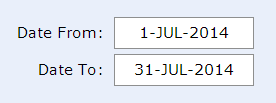
The Date From / Date To filter allows you to set a distinct date range for your reports. For example, selecting the dates 1-Jul-2014 and 31-Jul-2014 would result in your report containing time or expenses recorded within the month of July, 2014:
Please note: All reports consider the individual timesheet or expense claim item dates when creating their output, with the exception of the Expense Claim Listing report and all Expense Claim Data Export reports. Those reports use the Claim Date for determining which expense claim records to include in the report output and do not consider the dates of the individual expense claim items.
Why you would use this option:
Almost all reports you will want to create will cover only a certain time period of interest (for example, all time for a certain month). The Date From / Date To filter allows you to specify the date range of interest to you.
If either of the Date From or Date To filters are left blank, all time or expenses on or after, or on before the specified date will be included in your report. For example, setting a Date From of July 1st, 2014 and leaving the Date To blank:
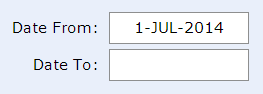
Would result in your report including all time or expenses which were recorded as occurring on or after July 1st, 2014.
If both the Date From and Date To filters are left blank, your report will contain all hours or expenses for all time.
Date Preset
What this does:
The Date Preset buttons allow you to set the Date From and Date To filters with a single button click.
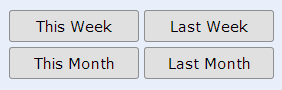
For example, if the date 'today' was July 19th, 2014, when the This Month button was clicked, the Date From and Date To filter would be set for the month of July, 2014:
Why you would use this option:
Your date presets provide a quick way to set recent date ranges of interest.
Employee
What this does:
The Employee filter allows you to set your report to only include time or expenses entered by a particular employee. For example, selecting the employee "Ada Byron":

Will result in your report only containing hours or expenses which have been entered in Ada's timesheets or expense claims
Why you would use this option:
If you wanted to create a report which only showed the time or expenses recorded by a single employee.
User Group
What this does:
The User Group filter allows you to set your report to only include time or expenses entered by a particular group of employees. For example, if a User Group named "Development Team" was created in your system which included the employees Ada Byron, Tycho Brahe and Geoff MacKay, selecting that User Group:

Would result in your report only containing time or expenses entered for those three employees in the "Development Team" group.
Why you would use this option:
User Groups allow you to create reports which reflect the effort of an identified group of employees. For example, if you were interested in reviewing how time was spent by the administrative staff of your office.
Project Group
What this does:
The Project Group filter allows you to set your report to only include time or expenses recorded to a particular group of projects. For example, if a Project Group named "Projects for Widgets Inc." was created in your system which included the projects for "Widget Co. - Data Management System", "Widget Co. - Quality Assurance Analysis" and "Widget Co. - Systems Analysis", selecting that Project Group:

Would result in your report only containing time or expenses entered for those three projects in the "Projects for Widgets Inc." group.
If your report is filtered to include a project group, the group's name will be attached to your report's title (for example, "Work in Progress Report - Projects for Widgets Inc.").
If you are using a project group to filter your report, the Billing Code filter option for "The selected project only" (as described below) cannot be used (though you can use the "All with this activity" and "All with this task" options). If a specific project is of interest to you, it should be added to your preferred project group.
Why you would use this option:
Project Groups allow you to create reports which consolidate the hours and expenses recorded for multiple projects. If there are a number of projects for which you would like to see the effort hours or expenses collected together, you can accomplish that by using a Project Group.
For example, if all work of a certain type (systems analysis, advertising, maintenance work, etc.) was of interest, a project group which contained projects of that type could be created. Similarly, project groups can be created to categorize projects performed for different clients (for example, all work performed for the "Widgets Inc." company, as shown above), or for projects which were found to be of internal project management interest (for example, work which was performed ahead of or behind schedule).
Billable Items To Include
What this does:
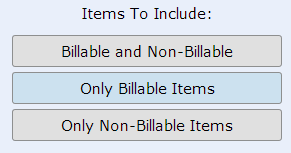
The Items To Include filter allows you to specify whether the time and expenses included in your report are only for billable items, only for non-billable items, or are for both billable and non-billable items. For example, to create a report which included only time or expenses indicated as being billable, the following filter option would be set:
If a report is filtered as only including billable or only including non-billable time, a note will be attached to the report's title indicating that the report is for "Billable Work Only" or "Non-Billable Work Only", respectively. If both "Billable and Non-Billable" items are included, no indicating text will be added to your report's title.
For invoice reports, a note that the invoice is for "Non-Billable Work Only" will be added to the project name listed on the invoice if the "Only Non-Billable Items" option is chosen. A regular invoice for billable work will have no further clarification added.
Why you would use this option:
The Billable Items to Include filter allows you to create reports which include only billable or only non-billable time or expenses, allowing you to see how much time or expenses have been recorded in your projects for each option. This filter can be disregarded by keeping it at the "Billable and Non-Billable" option (so, including all expenses and effort hours regardless of whether or not time or expenses were recorded as being billable).
Billing Code / Show Items For
What this does:
The Billing Code and Show Items For options are used together to identify the project, activity or task of interest for your report.
For example, if you were interested in viewing the work recorded on the Widget Co. Project's Analysis activity for Client Interviews, those items would be set in your Billing Code selectors:

Your Show Items For option identifies how your chosen Billing Code is to be used for filtering your report data.
If you would only like to see only time or expenses entered for the selected billing code (for this example, only items which have been recorded to "Widget Co. Project - Analysis - Client Interviews"), the option for "The selected project only" should be chosen. This indicates that your report will only include items for the billing code entered, with all other data excluded from your report.
For example, if you wanted to see all time recorded to the Analysis activity of the Widget Co. Project (so, include all tasks listed under that activity, in addition to any time billed to the activity itself), you would select:

And to see all time or expenses to the Widget Co. project, regardless of the activity or task under which they were recorded, you would select the project of interest while setting the Show Items For filter to indicate "The Selected Project Only":

If you wanted to retrieve all time or expenses recorded to a specific activity, regardless of the project under which those items have been recorded, you would select the "All with this activity" option, as with this example:

A report created with this filter option set would include all items recorded to the "Analysis" activity, regardless of the project under which that work had been recorded. For example, if "Analysis" was used in work for the projects "Widget Co. - Data Management System", "Widget Co. - Quality Assurance Analysis" and "Widget Co. - Systems Analysis", all time or expenses recorded to "Analysis" for those projects would be included in the returned report.
Your reports can also be set to display items for a common task across the projects recorded in your system by using the "All with this task" option, as with this example:

Which would include all time or expenses recorded to the "Client Interviews" task, regardless of the project or activity under which that work was recorded.
Report filters for 'all activities' and 'all tasks' use the activity/task code attribute of the activity or task selected to determine if they are the same activity or task across projects (and so should be included in the report). For example, if we set Senomix to show the project/activity/task code attributes in the billing code listing and repeated one of the above examples:

We can see that the common activity code by which activities will be matched for the selection is "ANSYS". So, for the above selection, your report would include all work which has an activity with the code of "ANSYS".
For reports filtered on common activities and tasks, the name is ignored and the element of common interest is the project/activity/task code. The code attribute (which is defined in each of your project, activity and task administration screens) can correspond with an internal reference value used to record work in your office, or can be an abbreviation of the type of work recorded.
Activity and task codes will always be identical for your recorded work if a shared project template is used for the definition of your projects. If different project templates are used in your office to record time for different project types (or if projects are defined in your office with separate activity and task listings), you should ensure that codes for the same types of work are identical to allow the use of your "Show items for" option.
Why you would use this option:
You can use your Billing Code and Show Items For options to view information about specific projects, activities and tasks, reviewing the effort hour data recorded for that work. For example, a Work in Progress report created for the Widget Co. Project would allow you to see how much time was spent on various aspects of that work, and perhaps where scheduling problems may have occurred as time progressed.
As with all other report filter elements, the Billing Code and Show Items For options can be used along with other report filter elements, allowing you to view a more refined slice of recorded time and expense data. For example, you could view all Analysis work which the Engineering user group performed for all projects you have grouped together as being ahead of schedule, which might help identify if time performed in analysis had an impact in improved performance later in project work.
Formatting Checkboxes
What this does:
Your output formatting checkboxes allow you to adjust the content and appearance of some time and expense reports. If a checkbox option is disabled (such as the "Only Show Codes for Hours Billed" checkbox shown below), that option cannot be changed from its default setting for the report.

The options provided by these checkboxes are:
Include Code
Indicates whether or not your report should add the project/activity/task code to the displayed output.
If selected, the code will be added to the beginning of each project, activity and task name displayed in the report, with a hyphen separating the two values.
Sort in Chronological Order
Indicates whether your report output is to be displayed in chronological order (with the checkbox set On) or reverse-chronological order (with the checkbox set Off). In cases where a report does not display records in chronological order, this option will be disabled.
Display Employee Info
Indicates whether additional employee information should be included in your report. For example, for the Project Estimates report, an additional breakout of employee information can be included in the report by setting this option On.
Only Include Active Billing Codes
Indicates whether or not your report should only contain billing codes which are listed as being active. If selected, the report will display "(active work only)" alongside the report title to indicate this active filter item.
If this checkbox is set On, the report will only list those projects, activities, or tasks which have their Active state set On.
Only Show Codes For Hours Billed
Indicates whether or not your report should show only those billing codes which have time or expenses recorded to them. If selected, your report will not display any billing codes which have zero time or expenses recorded to them (and so would be displayed as blank in your report). If not selected, your report will display all of a Project's billing codes, regardless of whether or not time or expenses have been billed to them.
Only Include Filtered
Indicates whether or not your report should only contain billing codes which correspond to the project, activity and task billing codes noted in the filter for your report.
If set On, your report will only include those entries which relate to your selected project, activity or task. The Spreadsheet Report, for example, will output all entered lines of all timesheets which include the project of interest to you unless this option is set On (in which case only the project of interest will be displayed in the timesheet listing).
If this checkbox is set Off, your report will include all entries for the records included in the result set. For example, by leaving this option Off when creating a Spreadsheet Report, you will be able to see all time recorded in weeks during which a certain project was worked upon.
User accounts can be set to have varying levels of reports access. Rather than provide an employee with full administrative rights, full, non-financial or personal reports access can be given to an employee to allow them to create reports for themselves or the staff in their scope of responsibility by using the "Manager and Personal Reports" sign-in option.
Reports access rights are set for user accounts in your user administration screen, with those access rights having the following effects in your create report screen:
Non-Financial Reports Access
If your Create Report Screen is being viewed in your reports (not administration) application, and you have your access rights set to Non Financial Reports Only, none of the Expense Claim, Financial or Data Export reports will be available.
Personal Reports Only Access
If your Create Report Screen is being viewed in your reports (not administration) application, and you have your access rights set to Personal Reports Only, reports will be fixed to only include non-financial information for your own recorded time and expenses.
Automatic Removal of Users and Projects from Reports
If your Create Report Screen is being viewed in your reports (not administration) application, and you have projects or users assigned to your user account, your reports will only include those users and projects to which you have been granted permission to access (through your user account's user and project assignments).
The exception to this rule is in the creation of a manager's timesheet or expense claim spreadsheet report, which will display the full timesheets for all individuals noted as being in that manager's assigned scope of responsibility (for that timesheet output, it is assumed that a manager can view the projects against which their reporting employees will be recording time and expenses).
If no users or projects are assigned to an individual through their user account's assignment options, and that individual has been granted reports access, they will have access to all system user and project records in their reports.
An employee with reports access rights will always be able to view their own timesheet data in their created reports.
86 Gerrard St East, Suite 16B
Toronto, Ontario
Canada, M5B 2J1
(416) 803-9705